Converting a WinUI Application to WebUI
Introduction
Today, most applications run on a server, and people use them through a web browser. That is why AIMMS introduced WebUI more than a decade ago. Since then, AIMMS has supported both WinUI and WebUI side by side. Future AIMMS releases will no longer support WinUI, so now is the time to convert existing applications to WebUI.
Converting an application combines three things:
Traditional programming. The
WinUI_to_WebUIconverter does the bulk of the work. It converts every WinUI page automatically into a WebUI page, with the same widgets and the same layout.Artificial intelligence. SENSAI, the AI built into AIMMS, handles the routine refinements, such as replacing the WinUI navigation by a workflow panel, and tidying up each page.
Human judgment. You, as the developer, keep the final say: you decide what looks right and what your users need.
This way, you can convert an existing WinUI application to WebUI quickly, without losing control over the result.
This article describes the conversion process. How to run the converter itself, and which options it has, is described in Operating WinUI_to_WebUI.
Prerequisites
AIMMS Developer 26.8. The converter opens the project with the latest installed AIMMS 26.8.x.
WinUI_to_WebUI.exe. See Operating WinUI_to_WebUI.Access to an AIMMS Cloud with SENSAI activated, to make changes with SENSAI. Without SENSAI, you can still convert the application and make all changes by hand. See Hello World of SENSAI Apps for how to connect AIMMS Developer to SENSAI.
The SENSAI skills you want to apply. See Asking SENSAI to apply a skill.
A way to store each step: git, recommended, or a backup copy of the project folder per step.
The converter and SENSAI both modify files in the project folder, such as the model
.amsfiles andwebui.json. Storing each step lets you compare a page before and after a change, and go back when a change does not work out. With git, each commit message documents what you changed, so you can easily find a version that worked, and see how you got there. Make sure the project files are really tracked: git does not store a folder listed in.gitignore.
Downloads
Original App:
AIMMS 26.8 WinUI Data ReconciliationConverted App:
AIMMS 26.8 WebUI Data Reconciliation
The Conversion Process
A conversion consists of a single automatic step, followed by an iterative refinement:
Apply the converter to the whole project.
Iterate until the WebUI application is ready:
Evaluate the current WebUI pages. Compare them with the original WinUI pages, and decide what to improve next.
Apply a change, to a single page or to a group of pages, by hand or with SENSAI. See Kinds of Change.
Store the result.
Each iteration refines the result of the previous one. Store the WinUI version before you start, and store the result of every step.
Step 1: Apply the converter
Run WinUI_to_WebUI in the project folder, as described in Operating WinUI_to_WebUI. The converter:
converts all WinUI pages into WebUI pages, with the same widgets and the same layout,
keeps the tree structure of the pages: the WebUI page tree has the same parent and child pages as the WinUI Page Manager, so your users find each page where they expect it,
adds the identifiers the WebUI pages need to a generated module in the main model and in each library, and
writes a conversion log,
<project>_conversion.md, which lists the objects it could not convert.
Open the project in AIMMS, check that the model compiles, and open the WebUI. Store this first converted version. It is the starting point for all later steps.
Warning
Running the converter again on the whole project rebuilds webui.json from scratch, and discards all changes made afterwards, by hand or with SENSAI. To reconvert a single page later, use the --page option. It leaves all other pages unchanged.
Step 2: Evaluate the current interface
Open the converted pages in the WebUI, and compare them with the original WinUI pages. Typical points to look for:
WinUI navigation, such as buttons that only open another page. WebUI offers a workflow panel and a menu for this. This point concerns a group of pages, often the whole application.
Buttons that start an action. In WebUI, these usually fit better in the page actions menu at the bottom right of the page.
Empty grid rows and columns, and widgets that use the screen space poorly.
Text that does not fit, such as table headers that are cut off.
Objects listed in the conversion log as not converted.
Pick one improvement at a time. Small steps are easier to review and easier to undo. Start with the changes that concern a group of pages, such as the workflow panel, and then refine the pages one by one.
Step 3: Apply changes
Apply the improvement you chose. The next section describes the kinds of change you can make.
Step 4: Store the changes
When you are satisfied with the change, store it, and describe in one line what you changed, for example “Run reconciliation page: replace navigation buttons by workflow panel”. When you are not satisfied, go back to the stored version, and try another way.
Then return to Step 2 for the next improvement, or the next page.
Kinds of Change
There are three ways to make a change. A manual change applies to a single page. A change made with SENSAI, with or without a skill, applies to a single page or to a group of pages, for example all pages below a parent page.
Manual changes
Some changes take human judgment, and are best made by hand, on a single page, in the WebUI editor or in the model. For example:
combining related values, such as a model status and an error measure, in one KPI widget, and
widening table columns, so that the headers are fully visible.
Asking SENSAI for an improvement
For routine changes, give SENSAI a simple instruction in the SENSAI chat in AIMMS Developer, for a single page or for a group of pages. For example:
On page "Run reconciliation model", eliminate the empty columns and rows.
On all pages, move the "This Section" widgets to Unassigned widgets.
Moving a widget to Unassigned widgets removes it from the page without deleting it. You can drag it back in the WebUI editor later.
Review what SENSAI changed before you store it. When an instruction concerns a group of pages, check a few of those pages.
Asking SENSAI to apply a skill
A SENSAI skill is a reusable set of instructions for a recurring task. A skill makes the result predictable: SENSAI follows the same procedure every time, checks its own work, and reports what it changed. To apply a skill, ask SENSAI in the chat, for example:
Apply skill aimms-workflow-panel.
The following skills are available for converted applications. Each has its own article, which describes what the skill does, how to add it to SENSAI, and how to apply it.
SENSAI Skill: Workflow Panel: replaces the WinUI navigation of a group of pages by a WebUI workflow panel.
SENSAI Skill: Buttons to Secondary Actions: moves the buttons of a page to the page actions menu.
When you make the same manual change on several pages, consider asking SENSAI to turn it into a skill of your own. See Hello World of SENSAI Apps.
Tip
Do not save from the WebUI editor while SENSAI is editing webui.json. The WebUI rewrites that file when it saves, and may overwrite the changes of SENSAI.
Example
The Data Reconciliation application shows the process on a single page, Run reconciliation model.
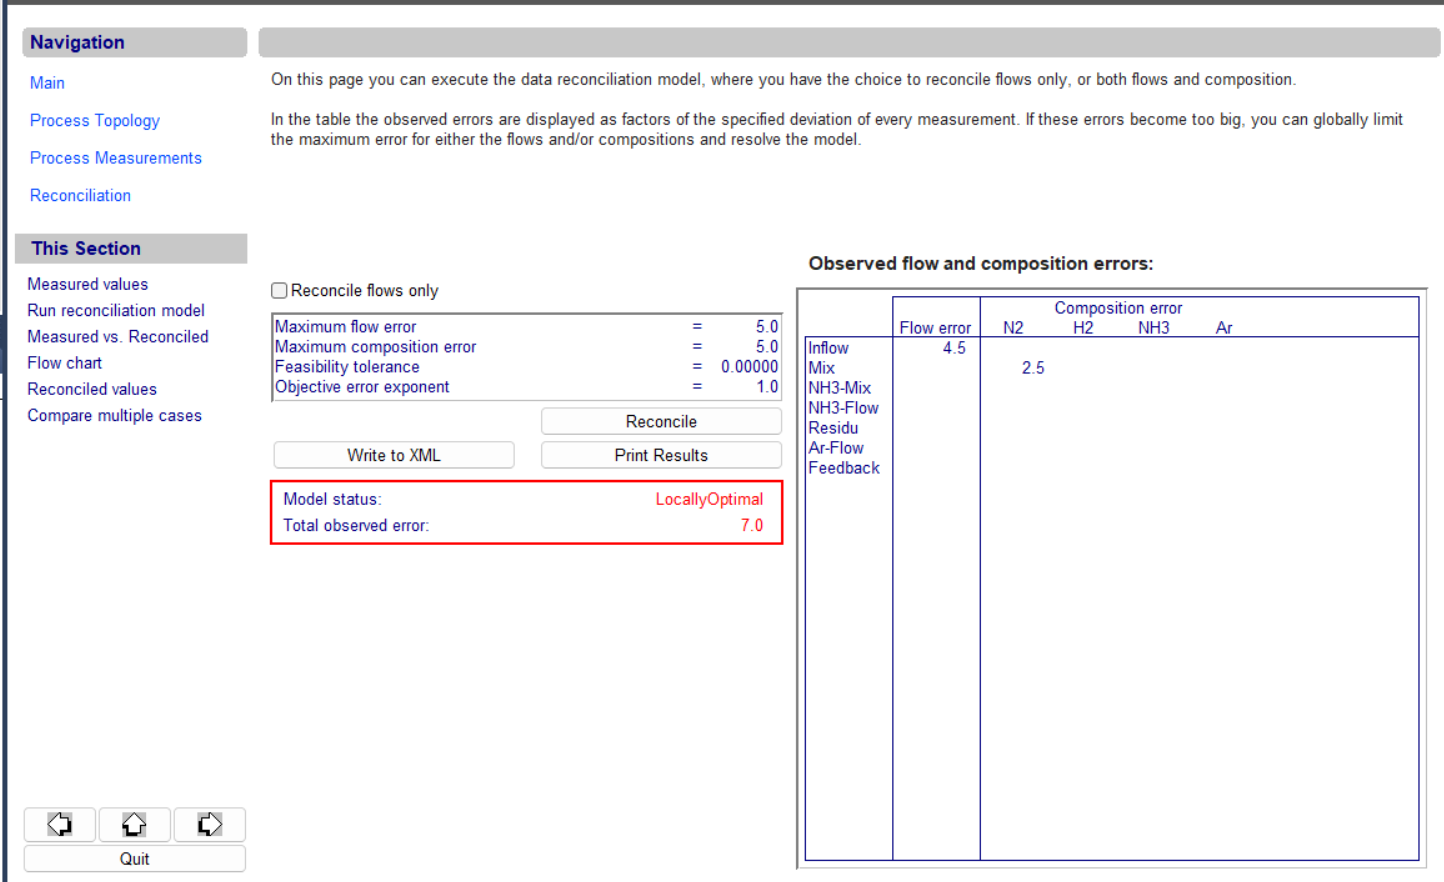
The original WinUI page. On the left are the navigation buttons. On the right are an introduction text, the settings and buttons to run the model, and a table of observed errors.
After the converter.
WinUI_to_WebUIconverted the page to a WebUI page with the same widgets and the same layout. The page tree on the left has the same structure as in WinUI. The WinUI navigation buttons came along as well, even though WebUI does not need them.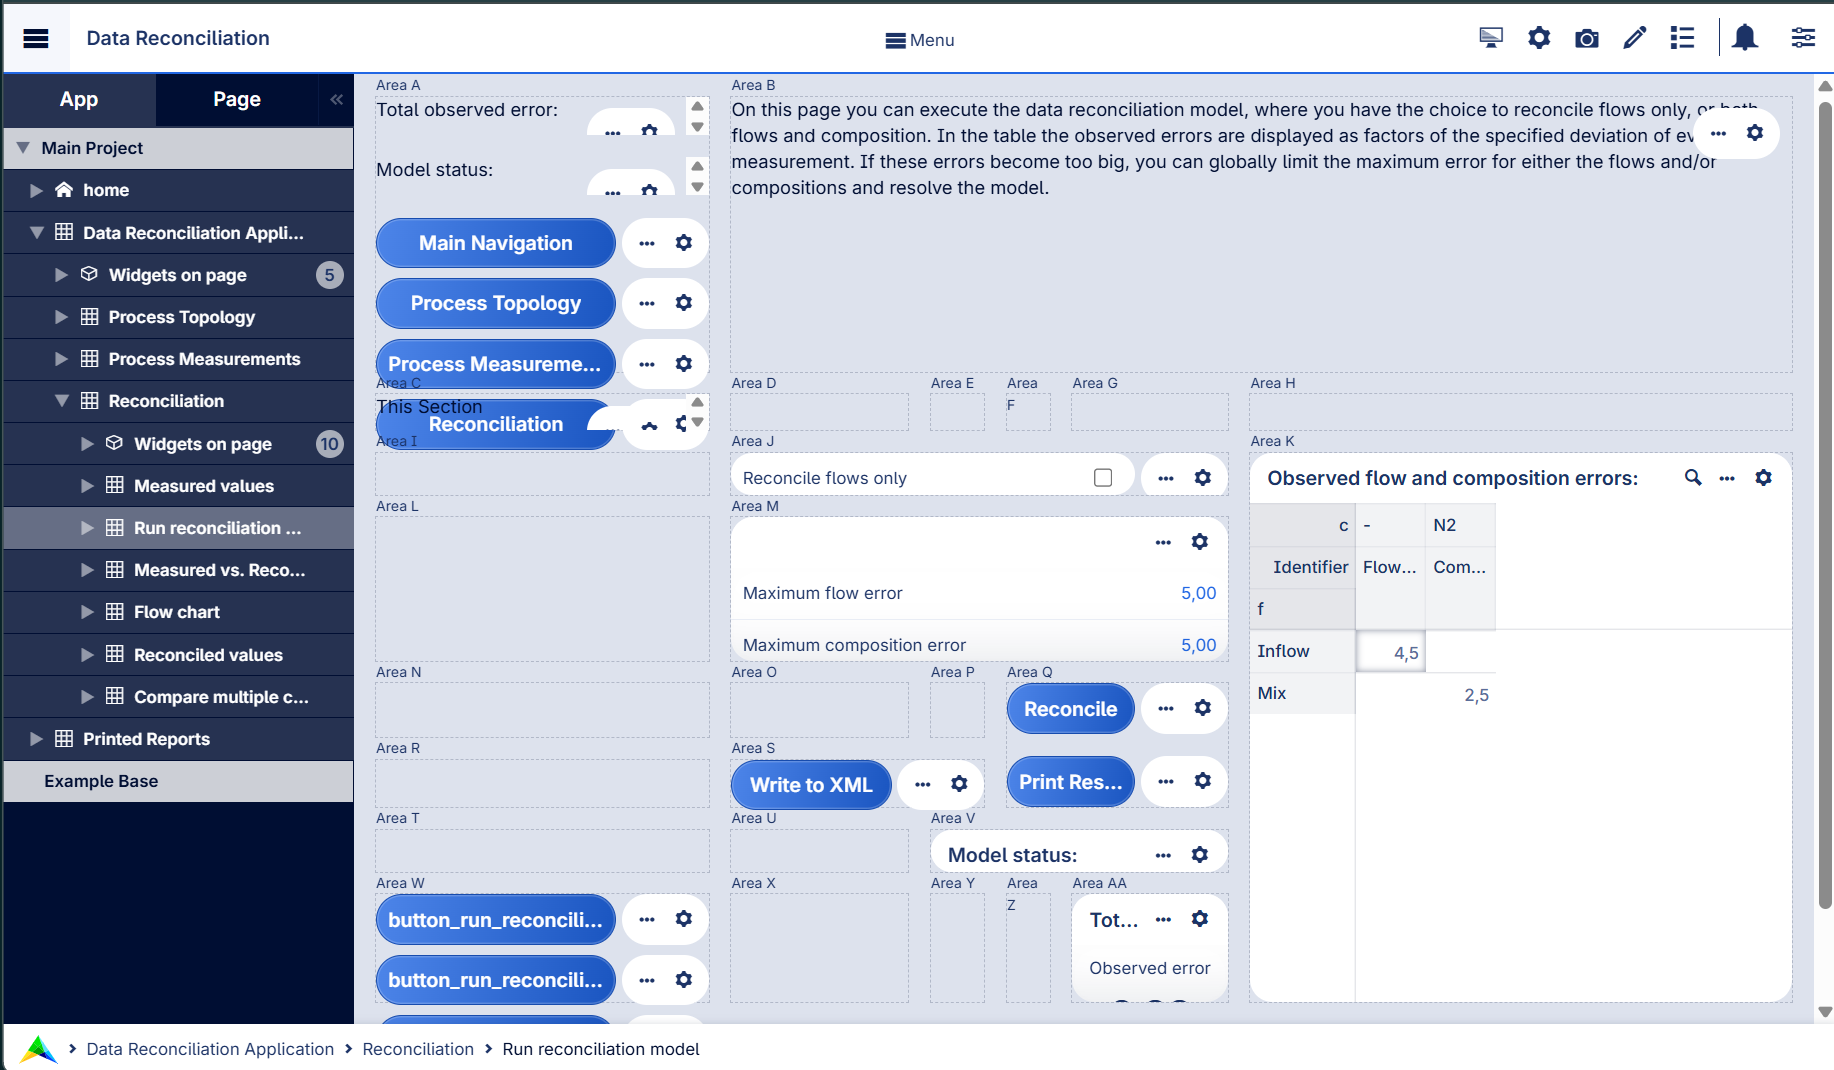
After the workflow panel skill. SENSAI applied the skill
aimms-workflow-panel. A workflow panel now shows all steps of the application in one place. The navigation buttons moved to Unassigned widgets, and the page uses the full width.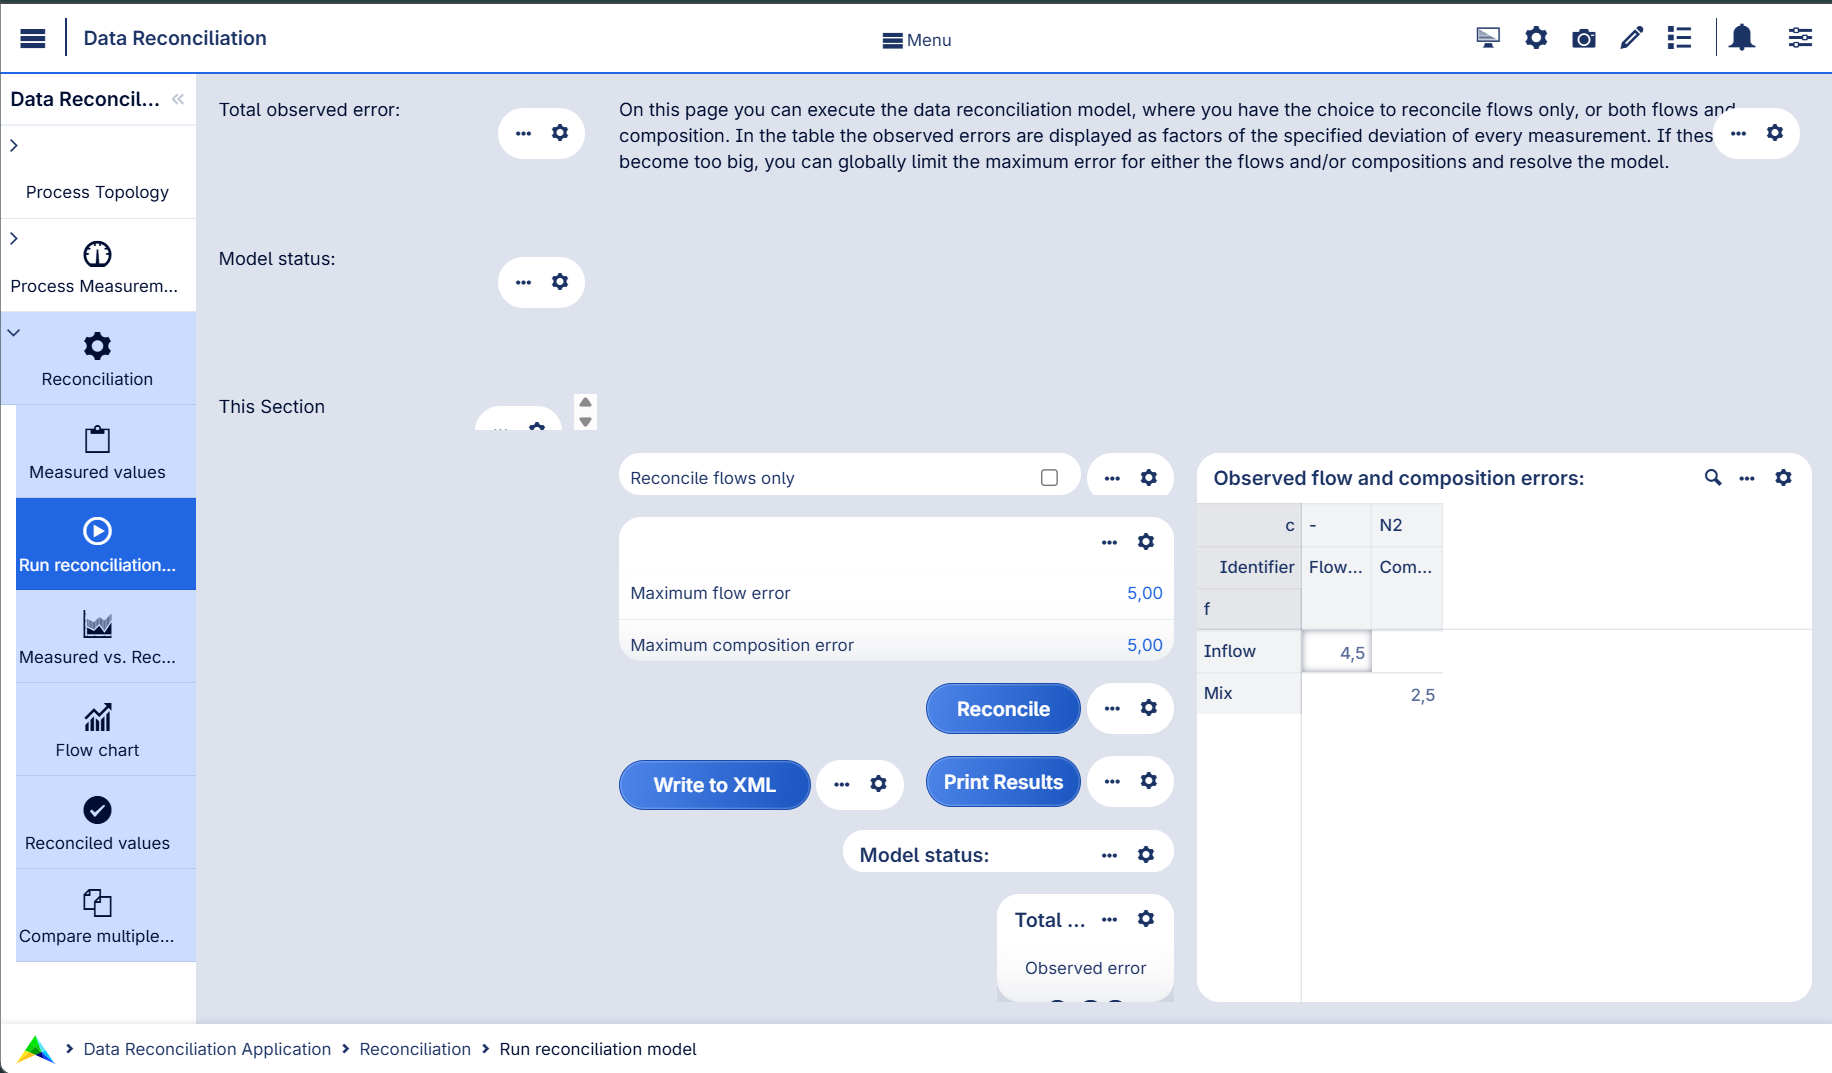
After asking SENSAI to tidy up. SENSAI eliminated the empty columns and rows, and moved the “This Section” widgets to Unassigned widgets. The page uses the screen space better.
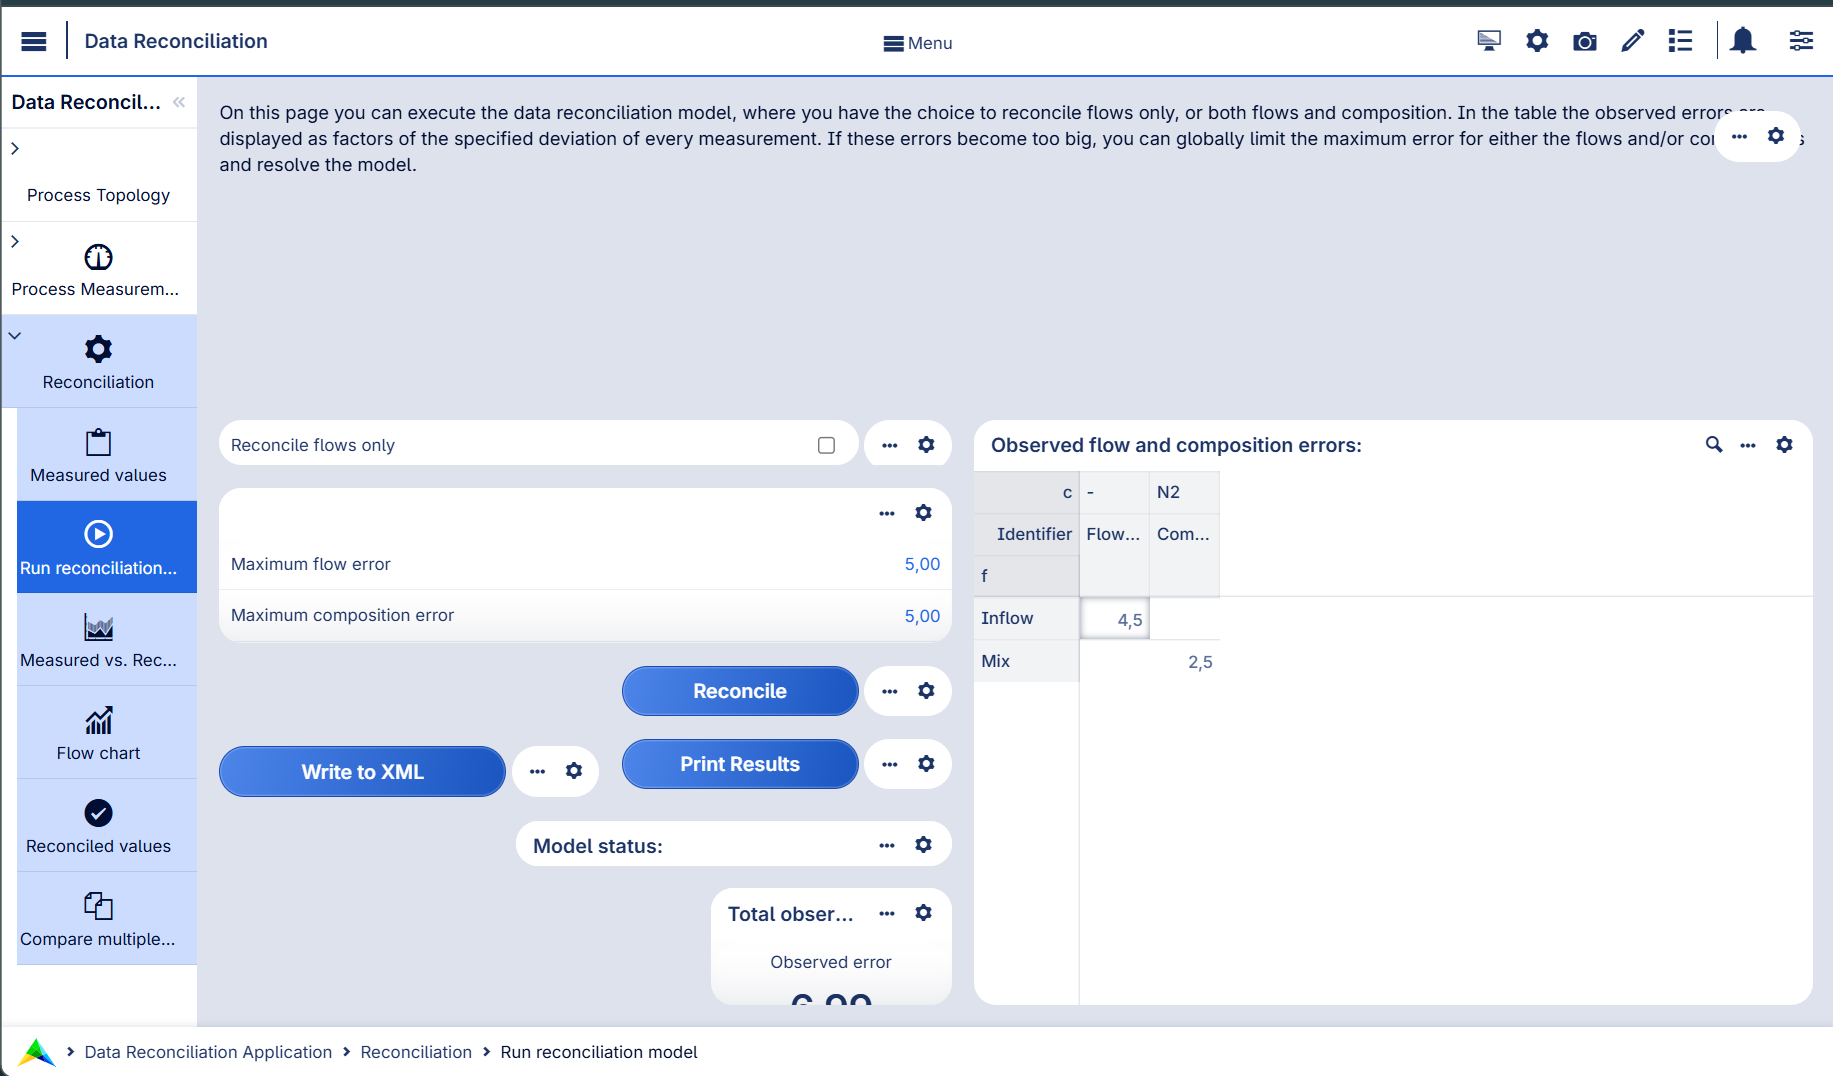
After tuning a page. SENSAI applied the skill
buttons-to-secondary-action, which moved the buttons to the page actions menu. By hand, the model status and the observed error are combined in one KPI widget, and the table columns are widened, so the headers are fully visible.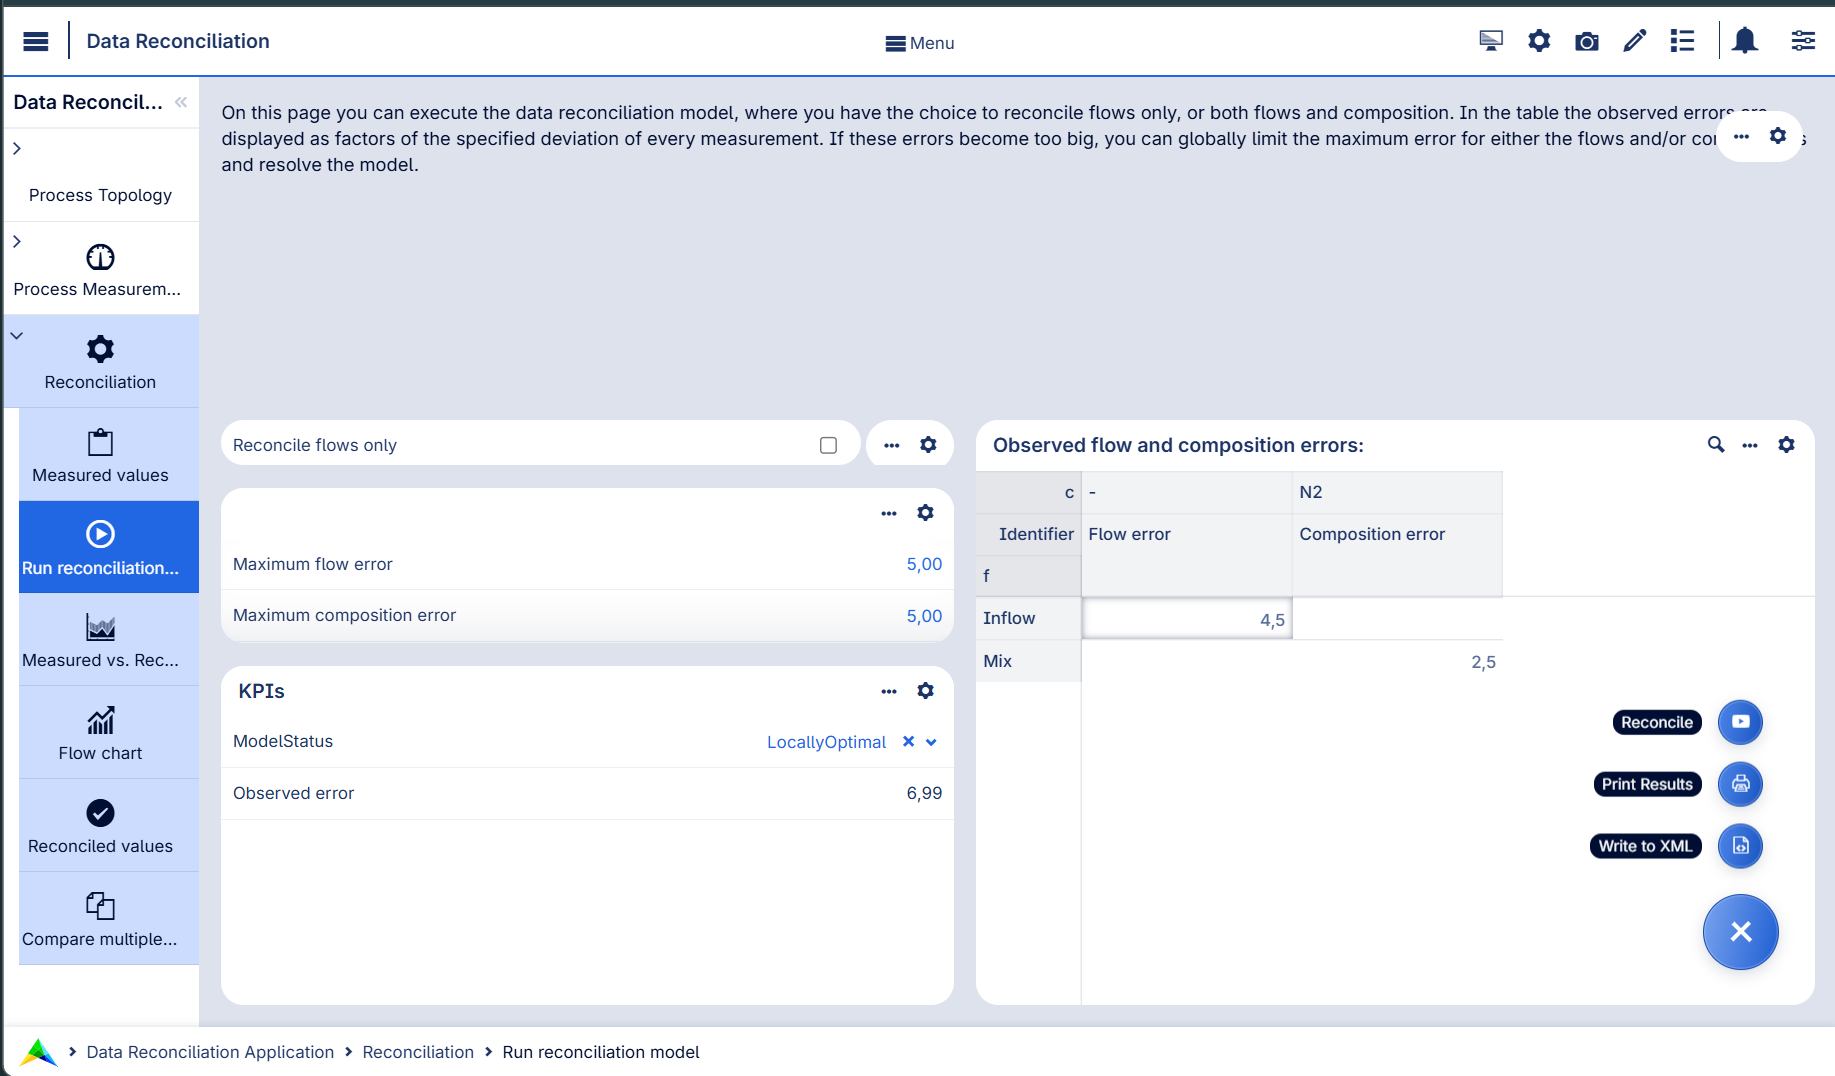
Finishing touch. Follow the instructions in AIMMS WebUI theming - logo to put a logo in the upper left. The change adds a small SVG logo,
resources/images/app-logo.svg, and a theme file,resources/css/logo-theme.css, that sets--bg_app-logo(the image, its position and size) and--spacing_app-logo_width(the space reserved for it). Both live in theMainProject/WebUIfolder, and you select the theme in the WebUI settings.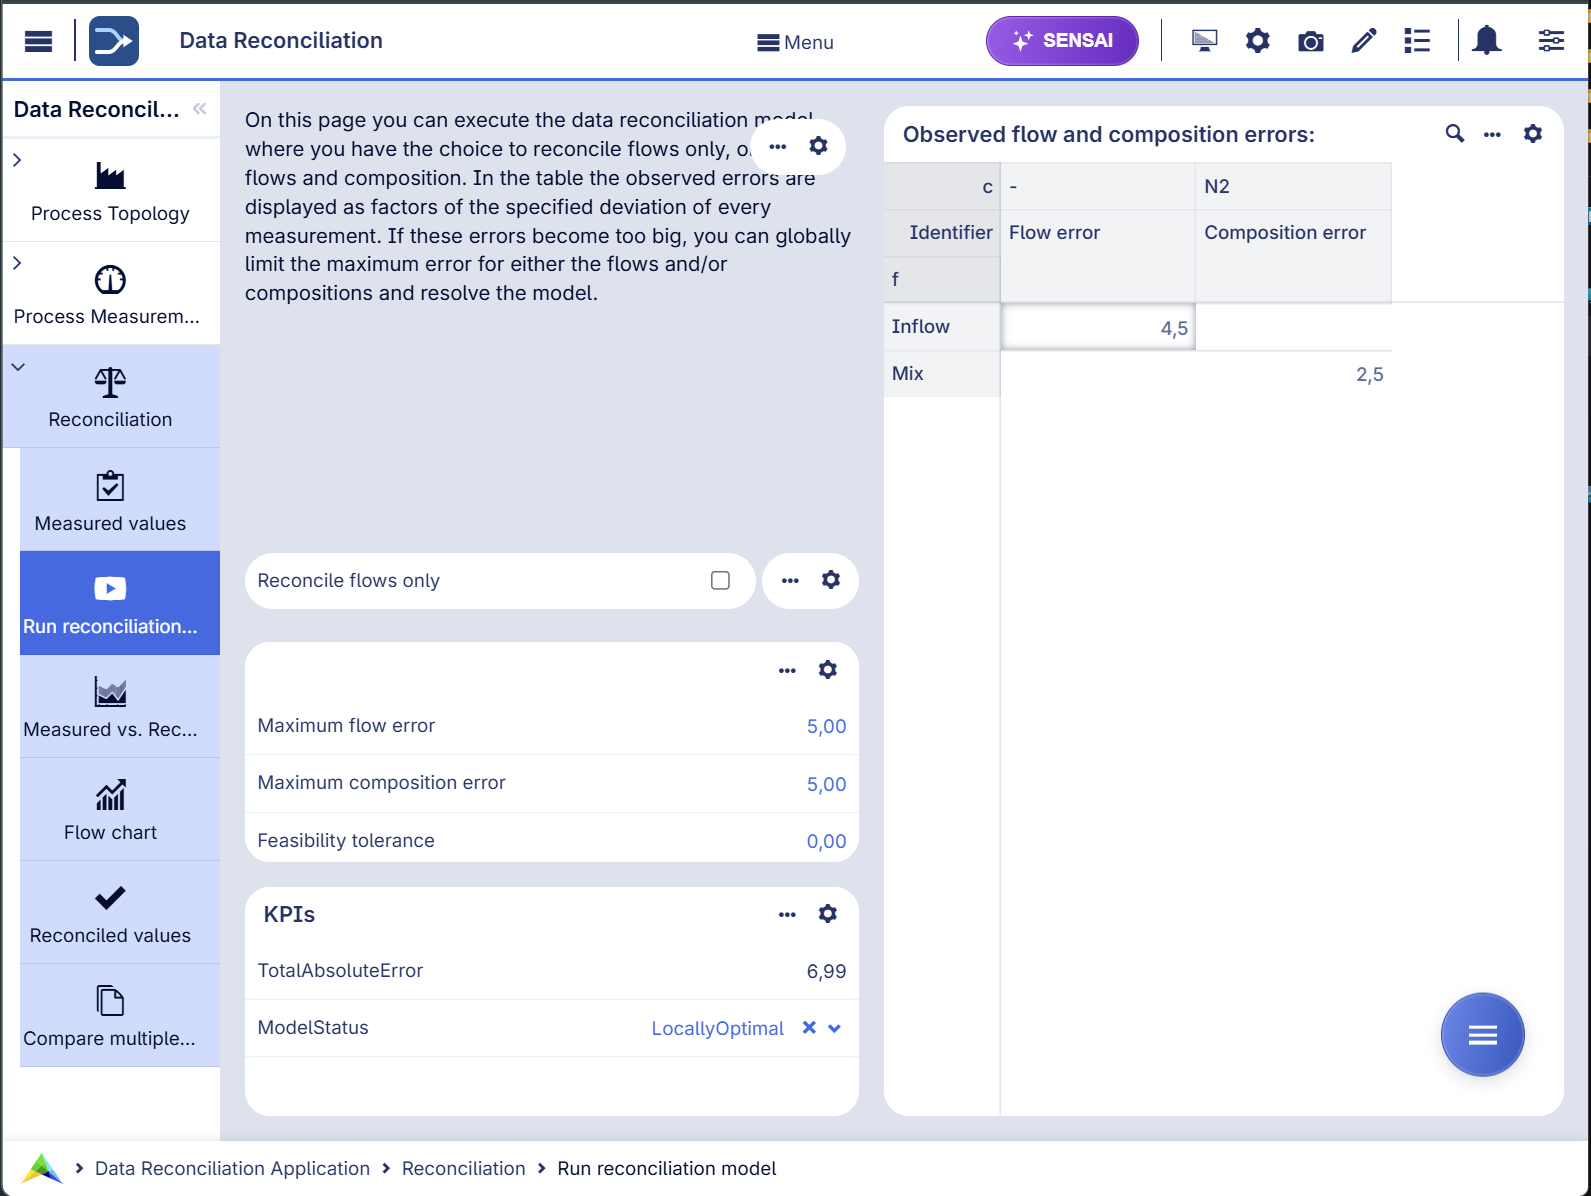
The result is a clean WebUI page that does the same as the original WinUI page.
Summary
To convert a WinUI application to WebUI, run the WinUI_to_WebUI converter once on the whole project, and then refine the result page by page. In each iteration, evaluate the pages, apply one change to a single page or a group of pages, by hand, with SENSAI, or with a SENSAI skill, and store the result. The converter does the bulk of the work, SENSAI handles the routine refinements, and you keep the final judgment.