How to Integrate the Data Exchange Library
The Data Exchange Library (DEX) allows you to connect data in a given format (like JSON, XML, table-based CSV/Excel) to your AIMMS model by using a mapping file. These data formats are often used in REST APIs to communicate data.
See also
For this article we will be working with SW_UseCase.zip example,
where we build an optimization model to find the least-cost solution.
Instead of integrating the data from an Excel file or from a database, we will be integrating the needed data from a JSON-file and use a mapping file to get the data to the correct identifier(s). The basic setup in this article can however be implemented for any tree-based data format.
Prerequisites
Make sure you have the Data Exchange Library installed.
Have a mapping file ready and place it somewhere in your project, preferably in a folder called
Mappings.Visit this article to read more about mappings and how to write one for your specific situation. Note that you can also generate a mapping file automatically for your project. We will be doing this in the next step.
Have a data file ready and place it somewhere in your project, preferably in a folder called
data. This is the data you want to read into the model. In this example, we’ve created a JSON data file calledtest.json, for testing purposes we’ve shortened the list so there are only two cities in it. The contents of our file look like this:
[
            {
                    "city": "Qal eh-ye Now",
                    "city_ascii": "Qal eh-ye",
                    "country": "Afghanistan",
                    "iso2": "AF",
                    "iso3": "AFG",
                    "lat": 34.98300013,
                    "lng": 63.13329964,
                    "pop": 2997.0,
                    "province": "Badghis"
            },
            {
                    "city": "Chaghcharan",
                    "city_ascii": "Chaghcharan",
                    "country": "Afghanistan",
                    "iso2": "AF",
                    "iso3": "AFG",
                    "lat": 34.5167011,
                    "lng": 65.25000063,
                    "pop": 15000.0,
                    "province": "Ghor"
            }
    ]
Generate Mapping File
The easiest way to get a template for your mapping based on your current model, is to auto-generate a mapping through the dex::GenerateDatasetMappings function.
This generates standardized mappings based on the dex::Dataset, dex::TableName, and dex::ColumnName annotations.
The generated mappings are then stored in the Mappings/Generated subfolder of the project folder.
To import test.json using dex::GenerateDatasetMappings,
it is needed to add the dex::Dataset, dex::TableName and dex::ColumnName annotations
to the related identifiers.
We were only able to do so by moving the identifiers (holding the same index)
that are relevant for our JSON data file into a new declaration and assign the correct dex
annotations to this declaration. For the parameter identifiers we’ve added column-names.
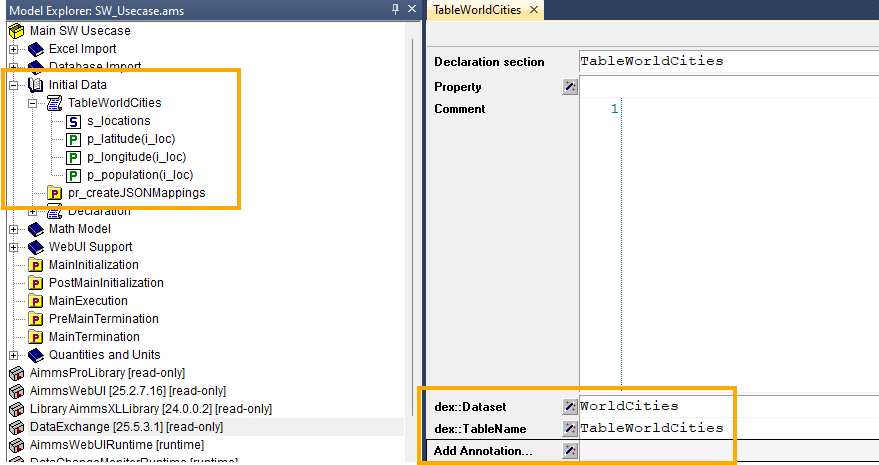
Fig. 40 The annotations on declaration-level

Fig. 41 The annotations on identifier-level
Once the annotations are set, by running dex::GenerateDatasetMappings directly, you will be generating only
the default mappings, which will not include JSON. To include JSON we need to update dex::DatasetGeneratorFilter,
this is already created in the procedure pr_createJSONMappings.
! will create all possible mappings
dex::DatasetGeneratorFilter(dex::gt, dex::mm, dex::amt) := 1;

dex::GenerateDatasetMappings;
After running the procedure pr_createJSONMappings which includes the auto-generating procedure, you should see the following under Mappings folder:
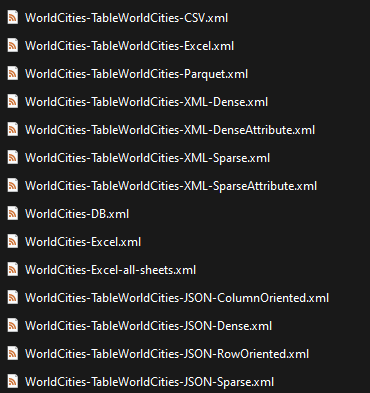
We can find the mapping file for JSON sparse mapping. Without edits, it looks like this:
<?xml version="1.0"?>
<AimmsJSONMapping>
        <ObjectMapping>
                <ArrayMapping name="rows">
                        <ObjectMapping>
                                <ValueMapping name="i_loc" binds-to="i_loc" />
                                <ValueMapping name="lat" maps-to="p_latitude(i_loc)" />
                                <ValueMapping name="lng" maps-to="p_longitude(i_loc)" />
                                <ValueMapping name="pop" maps-to="p_population(i_loc)" />
                        </ObjectMapping>
                </ArrayMapping>
        </ObjectMapping>
</AimmsJSONMapping>
We have to make a few small changes to this file, as we are working with an array-oriented dataset that holds objects. Hence we removed the first <ObjectMapping> tag. We can also remove the “name=rows” element from the <ArrayMapping> tag. Furthermode we had to change the name ‘l’ to ‘city’ for the first <ValueMapping>> as that is the correct name of the property in the JSON file. We couldn’t define this name in the annotations within the model as this specific identifier is a set that refers to an index:
<AimmsJSONMapping>
        <ArrayMapping>
                <ObjectMapping>
                        <ValueMapping name="city" binds-to="i_loc" />
                        <ValueMapping name="lat" maps-to="p_latitude(i_loc)" />
                        <ValueMapping name="lng" maps-to="p_longitude(i_loc)" />
                        <ValueMapping name="pop" maps-to="p_population(i_loc)" />
                </ObjectMapping>
        </ArrayMapping>
</AimmsJSONMapping>
We saved the file under the same name and are now ready to use it in our basic setup.
Basic Setup
Note
All functions from the library are referenced and described on this page.
For this article we use the above-mentioned JSON-based data file that holds data from two cities. For every city in the array we will need the name, latitude, longitude and the population and match these items to their respective identifiers in the model, as defined in the mapping file.
To use the mapping in a procedure, you must first read the mapping file into your model. You do this by setting up a procedure in which you call the dex::AddMapping function.
After this is done without errors or warnings, you can use the dex::ReadFromFile function to read the data from the specified data source.
This is ready in pr_readJSONMapping:
dex::AddMapping(
        mappingName :  "WorldCitiesMapping",
        mappingFile :  "Mappings/Generated/WorldCities-TableWorldCities-JSON-Sparse.xml");

dex::ReadFromFile(
        dataFile         :  "data/test.json",
        mappingName      :  "WorldCitiesMapping",
        emptyIdentifiers :  1,
        emptySets        :  1,
        resetCounters    :  1);
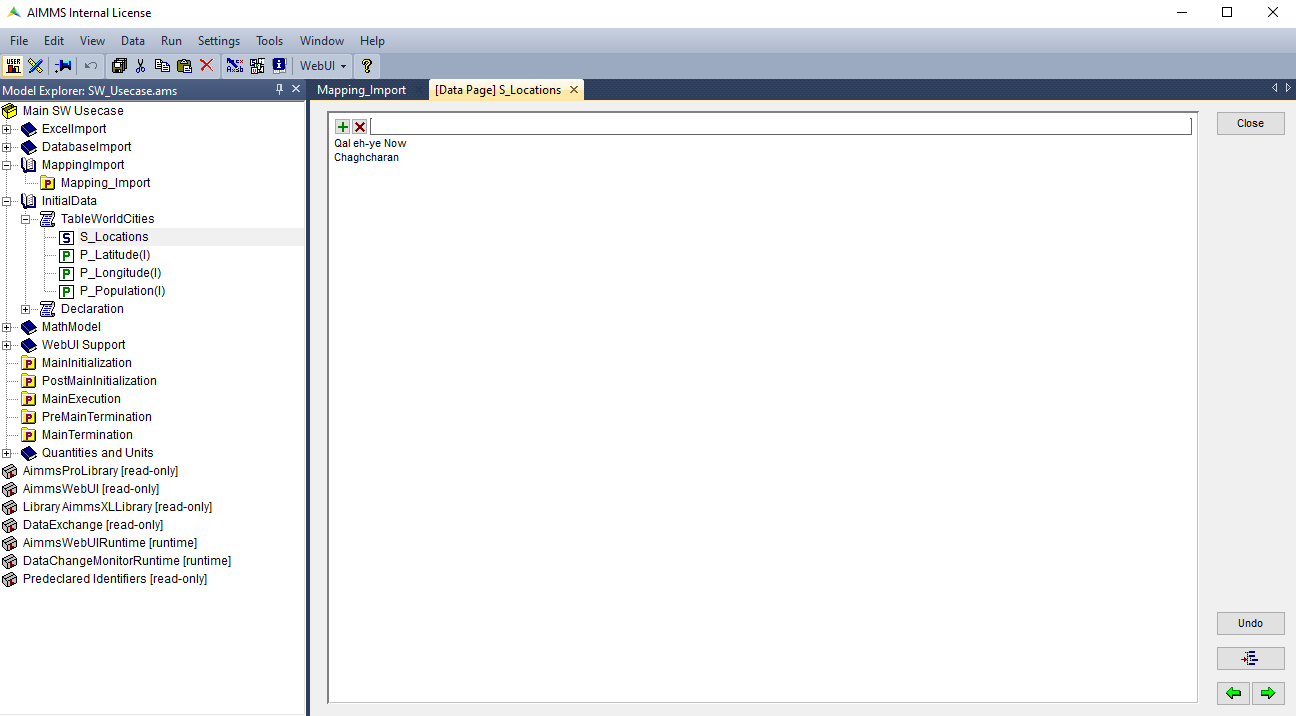
If this procedure is run successfully you will see that the data from the data source is imported as specified in the mapping file: