In today’s data-driven world, integrating robust machine learning capabilities into optimization applications is becoming increasingly important.
This article explores the seamless fusion of AIMMS with a Python service using FastAPI, Pydantic, and Uvicorn.
Learn how to leverage this integration by creating an OpenAPI AIMMS library, deploying it in AIMMS Developer, and utilizing the resulting application on the AIMMS Cloud.
AIMMS serves as a reliable workhorse in problem-solving, aiding organizations in data-driven decisions.
Python, renowned for data manipulation and modeling, joins forces with AIMMS, unlocking a toolbox of solutions for complex optimization challenges.
Join us on this journey to explore the bridge between AIMMS and Python, unlocking innovation and efficiency in your modeling endeavors.
The remainder of this article is organized as follows:
We’ll built the Python service.
We’ll deploy the service using an AIMMS application.
The input (training data) to this machine learning code is an array of observations,
whereby each observation consists of a comment (a text string), and a target (a binary indicating toxic when 1).
In addition, the input has a user-comment. The purpose of the service is to predict whether this user comment is toxic or not.
The output to this machine learning code is a zero (not toxic) or one (toxic). So how do we model these inputs and output?
Pydantic is renown for its data modeling.
This library is widely used for its data validation.
Here Basemodel is imported from Pydantic. First we construct the observation.
1# Usually an observation has many attributes, but we use only these two here.2classObservation(BaseModel):3comment:str# An observed text4target:int# A verified zero / one whether this text is considered toxic.
Next we create a row of observations and add a few scalars to it.
1# The input class for the Bias_in_AI app:2classBiasInAIInputTuples(BaseModel):3no_observations:int4observations:list[Observation]# length is no_observations5new_comment:str# determine for this string, whether it is toxic or not.
With that we have the input modeled. Next, we define the class for the output, which is just a single number.
1# The output class for the Bias_in_AI app:2classBiasInAIOutput(BaseModel):3is_toxic:int# 0: not toxic, 1: toxic.
Using FastAPI the paths are easily defined. First create a global that represents the service, called app.
1# Create the application object2app=FastAPI()
Line 2: Create the app, entry point for the provided services.
Next, for every path, here just one, name its inputs and outputs, as specified using Pydantic:
1# Define the actual function ``compute`` to learn and predict and associate this function with the path ``/compute``2@app.post("/compute",response_model=BiasInAIOutput)3asyncdefcompute(inp:BiasInAIInputTuples)->BiasInAIOutput:
Line 2: Define the path /compute.
Line 3: Actual function definition. As Pydantic is used by FastAPI, this ensures that /compute input is validated against the data validation rules of BiasInAIInputTuples.
In addition, the output will be according to the class BiasInAIOutput.
Extras from the Combo Pedantic, FastAPI and Uvicorn
There are a few extras that come with this combo, and, admittedly, I’ve grown used to those extras being present:
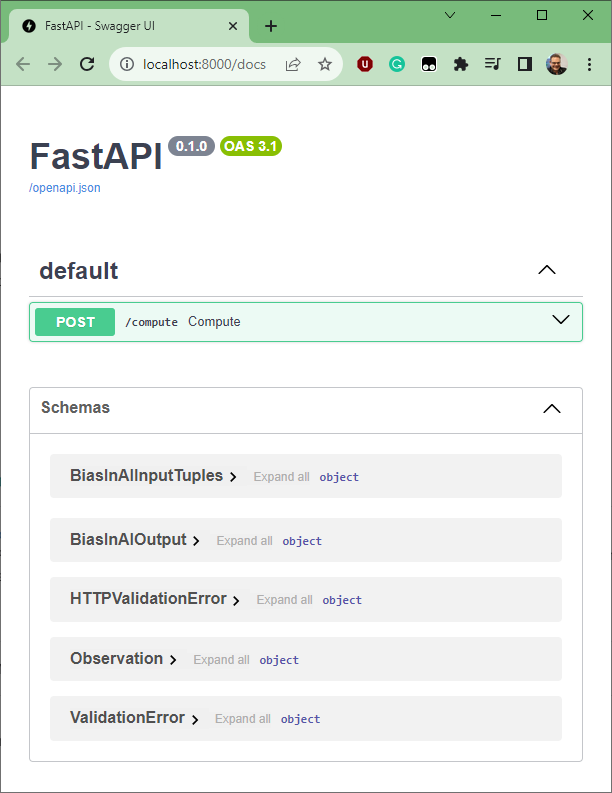
Get Swagger dynamic interface docs. By entering the URL http://localhost:8000/docs you will get the interface documented.
It looks as follows:
Get OpenAPI 3.1 specification.
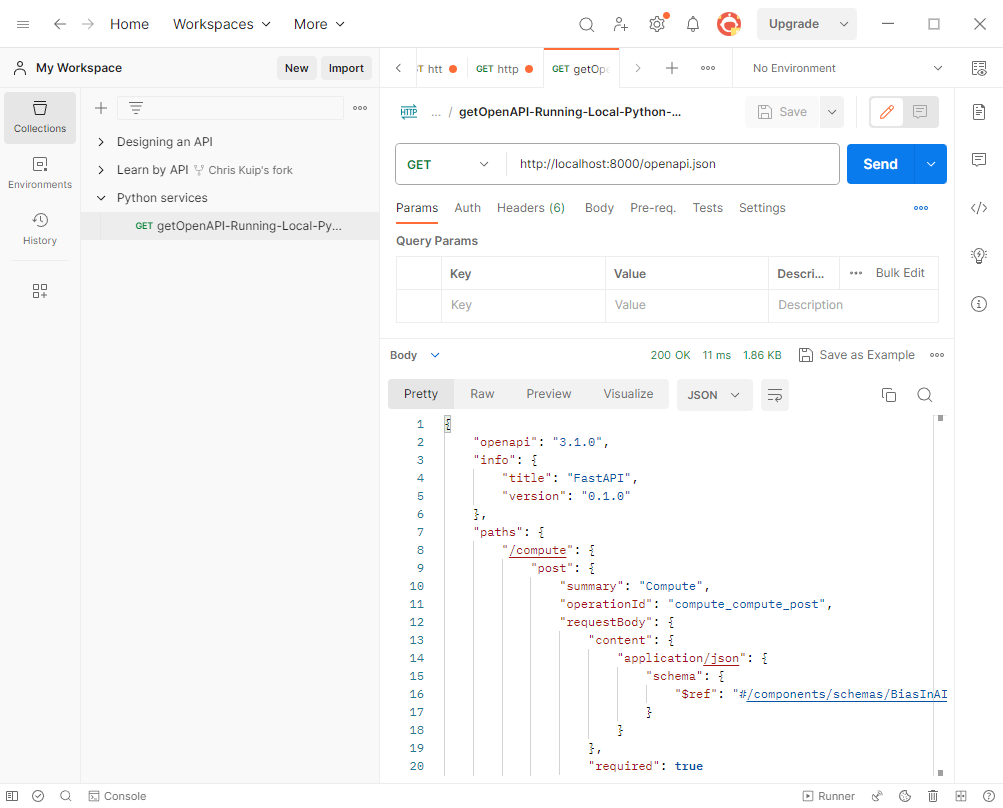
An OpenAPI 3.1 specification of the interface can also be easily obtained,
by doing a HTTP Get on http://localhost:8000/openapi.json.
Note that there are various tools to work with such a specification.
Using Postman, obtaining such a specification looks as follows:
We will be using this openapi.json file in the next chapter to base the communication by
the AIMMS client on.
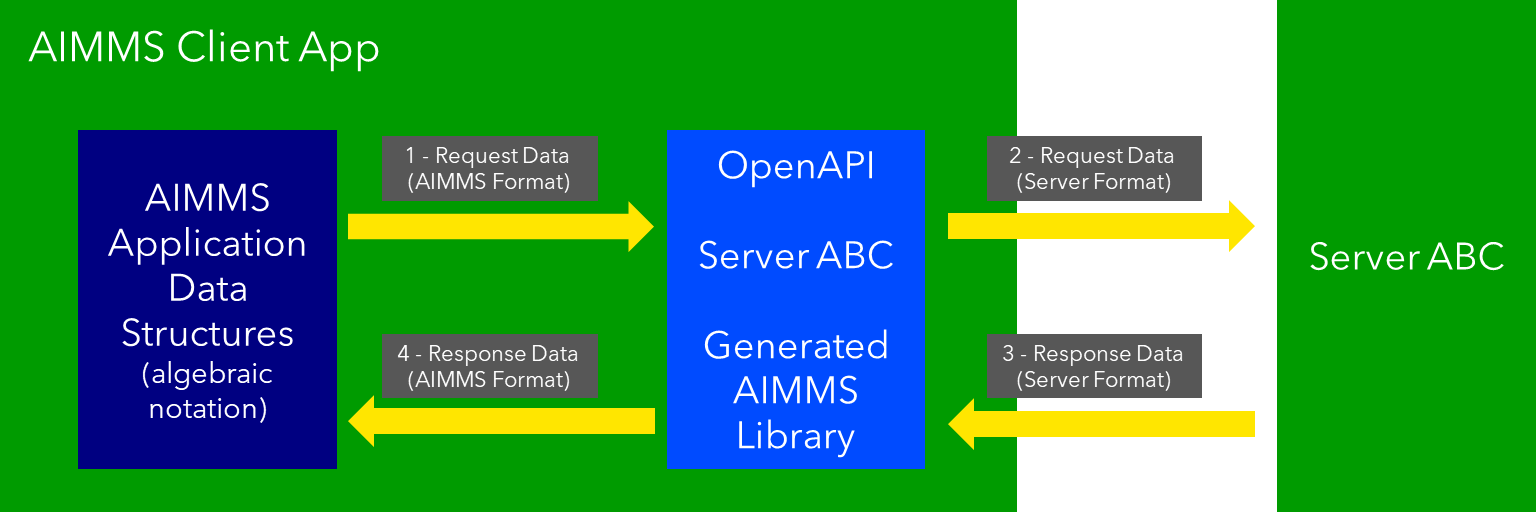
With this architecture, an AIMMS client only uses assignment statements to:
#. Provide the input to the service at hand, and
#. Receive the output from that service.
There is no need for the AIMMS app developer to write conversion specifications.
Building a OpenAPI Library from the Python App Running as a Service
https//:8000/openapi.json provides a copy of the OpenAPI 3.1 specification of the interface created in the Python app.
Using this specification, an AIMMS Library is created using:
Looking at Client with OpenAPI lib and Server Architecture. above, we start with action 1,
passing the data to the OpenAPI and initiating the request, action 2, implemented in the OpenAPI lib.
Procedurepr_callBiasInAITuples{Body:{! By not setting the RequestResponseFilePrefix, we will be using memory streams!! biasInAITuples::api::RequestResponseFilePrefix:= "requestsResponses/" ;! As the OpenAPI library maintains a history of Rest API calls, we need to identify the call at hand:biasInAITuples::api::NewCallInstance(ep_loc_callInstance);block! Fill in the data for making the request.! Pass the data from the data model to the corresponding data in the biasInAI library.biasInAITuples::_BiasInAIInputTuples::no_observations(ep_loc_callInstance):=p_def_cardID;biasInAITuples::_BiasInAIInputTuples::new_comment(ep_loc_callInstance):=sp_queryToInvestigate;biasInAITuples::_BiasInAIInputTuples::_observations::observations_iter:=ElementRange(1,p_def_cardID);ep_loc_iterToId(biasInAITuples::_BiasInAIInputTuples::_observations::i_observations):=element(s_ids,val(biasInAITuples::_BiasInAIInputTuples::_observations::i_observations));biasInAITuples::_BiasInAIInputTuples::_observations::comment_(ep_loc_callInstance,biasInAITuples::_BiasInAIInputTuples::_observations::i_observations):=sp_commentText(ep_loc_iterToId(biasInAITuples::_BiasInAIInputTuples::_observations::i_observations));biasInAITuples::_BiasInAIInputTuples::_observations::target(ep_loc_callInstance,biasInAITuples::_BiasInAIInputTuples::_observations::i_observations):=bp_target(ep_loc_iterToId(biasInAITuples::_BiasInAIInputTuples::_observations::i_observations));block! Check if we passed the data correctly._p_commentsCard:=card(biasInAITuples::_BiasInAIInputTuples::_observations::comment_);if_p_commentsCard<>p_def_cardIDthen! display _p_commentsCard, p_def_cardID ;raiseerror"internal error passing data \'comments\'";endif;endblock;endblock;! Install hook, which will copy the desired response data or handle the errorbiasInAITuples::api::compute_compute_post::UserResponseHook
:='pr_responseHookTuples';! Start the request.biasInAITuples::api::compute_compute_post::apiCall(ep_loc_callInstance);}ElementParameter_ep_id{Range:s_ids;}ElementParameter_ep_cmtNo{Range:biasInAITuples::_BiasInAIInputTuples::_observations::observations_iter;}Parameter_p_commentsCard;ElementParameterep_loc_callInstance{Range:dex::Instances;}ElementParameterep_loc_iterToId{IndexDomain:biasInAITuples::_BiasInAIInputTuples::_observations::i_observations;Range:s_ids;}}
On line 40, the call to the OpenAPI library is made to convert its data structures (action 2 in the image above) to the data structure format of the service, and to do make the Rest API call to the service.
Once, the request is handled by the server, and the result is passed back to the client, action 3,
the response is handled, action 4, as follows:
Procedurepr_responseHookTuples{Arguments:(ep_in_callInstance);Body:{ep_loc_status:=biasInAITuples::api::CallStatusCode(ep_in_callInstance);ifStringLength(sp_queryToInvestigate)>5thensp_log_cmtShort:=substring(sp_queryToInvestigate,1,5)+"...";elsesp_log_cmtShort:=sp_queryToInvestigate;endif;switch(ep_loc_status)do'200':! Call went ok.bp_calc_commentInvestigatedIsToxic:=biasInAITuples::_BiasInAIOutput::is_toxic(ep_in_callInstance);ep_calc_queryAnswer(ep_query):=ifbp_calc_commentInvestigatedIsToxicthen'Toxic'else'Not Toxic'endif;sp_calc_imageQueryAnswer:=ifbp_calc_commentInvestigatedIsToxicthen"toxic.png"else"not_toxic.png"endif;biasInAITuples::_BiasInAIInputTuples::EmptyInstance(ep_in_callInstance);biasInAITuples::_BiasInAIOutput::EmptyInstance(ep_in_callInstance);'422':! HTTP validation error.default:display{biasInAITuples::_HTTPValidationError::_detail::msg,biasInAITuples::_HTTPValidationError::_detail::type_},biasInAITuples::_HTTPValidationError::_detail::_loc::loc;raiseerrorformatString("biasInAITuples::isToxic(%s)/%s failed ( status: %e, error: %e): %s",sp_log_cmtShort,ep_in_callInstance,biasInAITuples::api::CallStatusCode(ep_in_callInstance),biasInAITuples::api::CallErrorCode(ep_in_callInstance),"");endswitch;}Comment: { "Client specific code for handling the response from the server, here whether the comment at hand is toxic or not."DeclarationSectionLocals{ElementParameterep_in_callInstance{Range:dex::Instances;Property:Input;}ElementParameterep_loc_status{Range:dex::HTTPStatusCodes;}StringParametersp_log_cmtShort;}}
The procedure pr_responseHookTuples specified above, looks a bit bulky, but the essence,
for a successful call, verified by HTTP status code 200, is on line 13.
Subsequently, lines 14, 15 are used for the communication to the end-user.
The remainder of this procedure is to notify, handle errors, and track when needed.
Regarding to Client with OpenAPI lib and Server Architecture. : action 3 is taken care of by the callback procedure
declared next to the apiCall procedure called at the end of pr_callBiasInAITuples.
Action 4, corresponds to the procedure pr_responseHookTuples just discussed.
The above provides a nice framework that can be used on a development machine.
Once the AIMMS app and the Python app are finished, it is possible to test the combo on your development machine.
First start the Python app, this can be achieved by using Pycharm as interpreter or by starting the Python code from Command Prompt.
Starting from Command Prompt:
At the bias-in-ai\PythonSource311 folder, start Command Prompt and execute main.py.
Using Pycharm:
Open main.py through Pycharm and press the execute button.
If successful, both options should come up with something like:
INFO:     Started server process [6320]
INFO:     Waiting for application startup.
INFO:     Application startup complete.
INFO:     Uvicorn running on http://:8000 (Press CTRL+C to quit)
After this you can start the AIMMS App in AIMMS Developer.
Navigate to page Results, and enter a phrase for which you want the toxicity to be tested.
Send it to the Python service by clicking on the two masks in the lower right of the screen. After a minute or so, the response should come back.
Note that training takes place for every request made; there is no caching of the computed machine learning model built in yet.
Modern tools such as: Python, especially the libraries Pedantic, FastAPI, and uvicorn, AIMMS Data Exchange library, especially the generation of OpenAPI clients,
and AIMMS Cloud, especially the feature to launch additional services make connecting a Python service to an AIMMS app, and subsequently deploying the combo, relatively straightforward.