Warning
Please note that the documentation you are currently viewing is for an older version of our technology. While it is still functional, we recommend upgrading to our latest and more efficient option to take advantage of all the improvements we’ve made.
Use the IBM Image Recognition API
In this article, we will show how to use the Image Recognition API from IBM to identify an image.
This API takes an image (JPG, PNG, GIF, etc) and returns a JSON file explaining the result of the machine learning algorithm trying to recognize it.
Prerequisites
Before we begin, make sure you have done the following:
Download and unzip the photo from the link below, and place it at the root of your project folder.
Read the IBM tutorial and obtain your own API Key from the link below. The CURL section is not relevant for this case.
Install the AIMMS HTTP Client Library according to AIMMS Documentation: Adding the HTTP Client Library.
Basics of IBM Cloud APIs
You can find information about this API in IBM Cloud API Docs: Visual Recognition.
The Authentication system we’ll be using is a simple API key. You can use a GET request using the URL of a photo, or a POST request to send the document to analyze to the server. (Here, we’ll be using the POST request, explained in IBM docs in section .)
There are 3 kinds of parameters we can set for this method.
Headers:
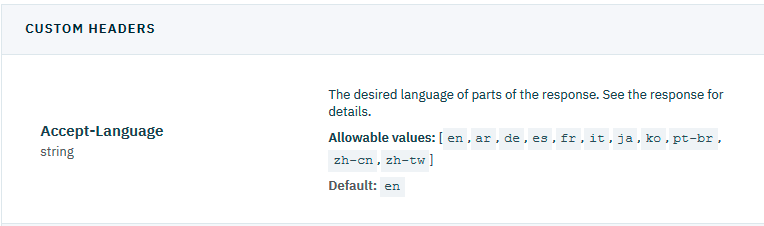
We’ll set the language for the answer file to
enfor English.Query parameters:

We’ll specify the version of the API we want to use, in this case
2018-03-19.Form parameters:
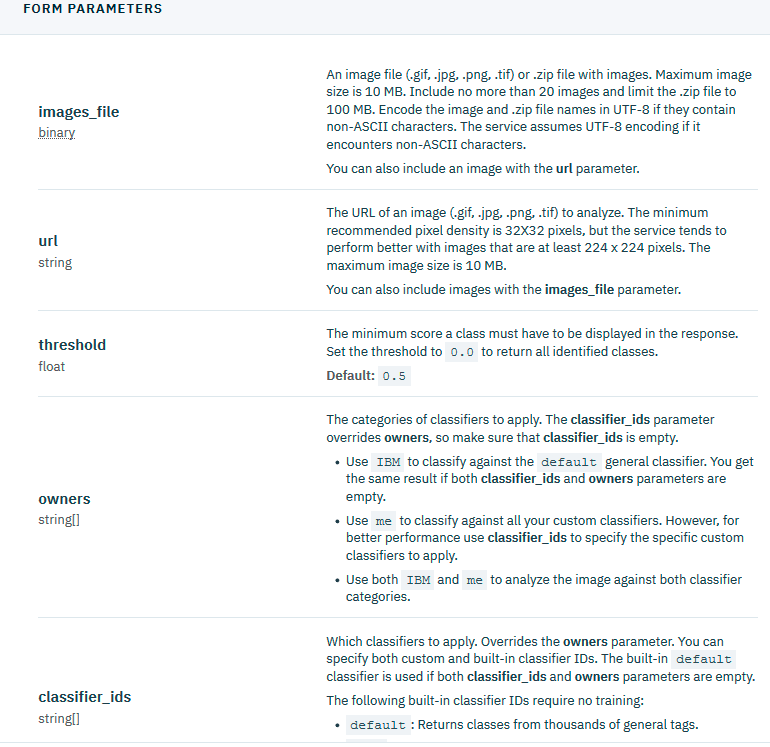
We’ll be using the
images_fileparameters that is used to set the photo we want to analyze. We’ll also set the parametersthresholdandClassifiers_idsas an example.
The IBM documentation gives examples using CURL, a client for formulating HTTP requests. Here we’ll find out how to translate the CURL requests into AIMMS and set the parameters.
Example Project
You can download the example project here:
We’ll first show how to get the JSON file. Then we will talk about how to specify the following:
Query parameters
Form parameters
Request headers
Getting the JSON File
The final code will be:
 1SP_requestFileName:="clownfish.JPG";
 2SP_responseFileName := "Answer.json";
 3SP_apikey:="YOUR_API_KEY";
 4
 5SP_Requestparam:={
 6    'version' : "2018-03-19",
 7    'threshold' : "0.6",
 8    'classifier_ids' : "default"
 9};
10web::query_format(SP_Requestparam,SP_formattedRequestParam);
11
12!endpoint given on the IBMCloud documentation
13SP_requestURI := "https://gateway.watsonplatform.net/visual-recognition/api/v3/classify?"+SP_formattedRequestParam;
14
15!initialize request
16web::request_create(SP_requestId);
17
18!Set Headers and add a new one.
19web::HttpHeaders:= DATA{ Accept, Accept-Encoding, Authorization, Cache-Control, Content-Length, Content-Type, Transfer-Encoding, Location ,Accept-Language};
20web::request_getHeaders(SP_requestId, SP_myHttpHeaders);
21SP_myHttpHeaders[ 'Accept-Language' ] := "en";
22
23!Authentication
24web::base64_encode( "apikey" + ":" + SP_apikey, SP_authorization);
25SP_myHttpHeaders[ 'Authorization' ] := "Basic " + SP_authorization;
26web::request_setHeaders(SP_requestId, SP_myHttpHeaders);
27
28!Set request
29web::request_setURL(SP_requestId, SP_requestURI);
30web::request_setMethod(SP_requestId, "POST");
31web::request_setRequestBody(SP_requestId, 'File', SP_requestFileName);
32web::request_setResponseBody(SP_requestId, 'File', SP_responseFileName);
33web::request_getOptions(SP_requestId,SP_requestOption);
34SP_requestOption['requestTimeout'] := "30";
35web::request_setOptions(SP_requestId, SP_requestOption);
36web::request_invoke(SP_requestId, P_responseCode);
Additionally, you’ll need these identifiers:
 1StringParameter SP_requestFileName;
 2StringParameter SP_responseFileName;
 3StringParameter SP_requestURI;
 4Parameter P_responseCode;
 5StringParameter SP_requestId;
 6StringParameter SP_requestOption {
 7    IndexDomain: web::co;
 8}
 9StringParameter SP_apikey;
10StringParameter SP_myHttpHeaders {
11    IndexDomain: web::httpHeader;
12}
13StringParameter SP_authorization;
14Set S_Param {
15    Index: i_p;
16    InitialData: DATA{version,threshold,classifier_ids};
17}
18StringParameter SP_Requestparam {
19    IndexDomain: i_p;
20}
21StringParameter SP_formattedRequestParam;
In this article, we will analyze only selections of the code. You can read more generally about HTTP requests in AIMMS in Extract XML File from a Server with the HTTP Library.
Query Parameters
To begin, we need to know how to specify the query parameters. Let’s check the example of the documentation using CURL.

Here, the URL is specified at the end of the request, and the query parameters are added at the end of the endpoint of the URL. We can do the same thing in AIMMS:
1SP_Requestparam:={
2    'version' : "2018-03-19",
3};
4web::query_format(SP_Requestparam,SP_formattedRequestParam);
5SP_requestURI := "https://gateway.watsonplatform.net/visual-recognition/api/v3/classify?"+SP_formattedRequestParam;
Form Parameters

In the given example, the form parameters are specified by writing -F parameter= value.
From the CURL documentation (in section 4.2 : GET ) we learn that when you specify this kind of parameters in CURL, the client then redirects to another URL, i.e., the base URL plus the formatted form parameters.
We can also do the same thing in a different way in AIMMS. Let’s transform the previous code and configure the form and query parameters.
1SP_Requestparam:={
2    'version' : "2018-03-19",
3    'threshold' : "0.6",
4    'classifier_ids' : "default"
5};
6web::query_format(SP_Requestparam,SP_formattedRequestParam);
7SP_requestURI := "https://gateway.watsonplatform.net/visual-recognition/api/v3/classify?"+SP_formattedRequestParam;
The threshold and classifier_ids parameters can be set in the request URL but the images_file doesn’t have a text value or a float we can put in the URL, so it needs to be set elsewhere.
For that, we can use the web::request_setRequestBody method to put the file to be analyzed in the body of the request which sends the file to the server.
1SP_requestFileName:="clownfish.JPG";
2web::request_setRequestBody(SP_requestId, 'File', SP_requestFileName);
Specifying Headers
We want to specify the headers of the request.
More specifically, we want to specify a header called Accept-Language. We need to add it to the list of headers, as is not a native header of the HTTP Client Library.
1web::HttpHeaders:= DATA{ Accept, Accept-Encoding, Authorization, Cache-Control, Content-Length, Content-Type, Transfer-Encoding, Location ,Accept-Language};
And then we can set the headers to their proper values.
1web::request_getHeaders(SP_requestId, SP_myHttpHeaders);
2SP_myHttpHeaders[ 'Accept-Language' ] := "en";
3web::request_setHeaders(SP_requestId, SP_myHttpHeaders);
Authentication

In the documentation example, it is done by writing -u apikey:{your_api_key}.
In AIMMS, we’ll use the Authentication header and set a basic authentication as referenced in Basic Access Authentication.
(Here, the user ID is “apikey” and the password is your API key.)
1web::base64_encode( "apikey" + ":" + SP_apikey, SP_authorization);
2SP_myHttpHeaders[ 'Authorization' ] := "Basic " + SP_authorization;
3web::request_setHeaders(SP_requestId, SP_myHttpHeaders);
Executing the complete code, our JSON file will be returned in the SP_responseFileName direction. The JSON code can be directly read into the AIMMS model using the Data Exchange library.
Finally, to learn how to extract the XML data into AIMMS, read Extract Data from an XML File.