Vessel Scheduling
Story
In this practical example, an efficient plan is developed for delivering large cargoes using oil tankers.
The model assumes each ship can carry only one cargo at a time, and once the time horizon begins, all vessels head directly to the loading port. Upon loading, each vessel proceeds directly to the delivery location within its designated time window.
Constraints include ensuring each cargo is loaded inside the determined time window, each cargo being transported by only one vessel, and each charter vessels being assigned to only one route at a time.
The objective is to minimize costs associated to combinations of cargoes and routes.
Mathematical Model
To appreciate the complexity of the below mathematical formulation, it is important to note that the number of routes grows combinatorially with the number of cargos. For instance, with 7 vessels and 20 cargos, the number of routes can exceed half a million.
Vessel Scheduling Model |
||
|---|---|---|
Sets and indices: |
||
\(v\), \(v \in Vessels\) |
Vessels |
|
\(c\), \(c \in Cargos\) |
Cargos |
|
\(r\), \(r \in Routes\) |
Routes |
|
Parameters: |
||
\(D_{v,r} \in \{ 0, 1 \}\) |
Route \(r\) used by vessel \(v\): |
|
\(CR_{c,r} \in \{ 0, 1 \}\) |
Cargo \(c\) on route \(r\): |
|
\(IC_{v} \in \mathbb{R_{+}}\) |
Idle cost for vessel \(v\): |
|
\(SC_{c} \in \mathbb{R_{+}}\) |
Cost cargo \(c\) handled on spot market: |
|
\(T_{r} \in \mathbb{R_{+}}\) |
Cost executing route \(r\): |
|
Variables: |
||
\(a_{(v,r)|D_{v,r}} \in \{ 0, 1 \}\) |
allocate vessel \(v\) to route \(r\): |
|
\(s_{c} \in \{0..1\}\) |
cargo \(c\) is left to the spot market: |
|
\(i_{v} \in \{0..1\}\) |
vessel \(v\) remains idle: |
|
Constraints: |
||
1 |
\(\forall c: \sum_r a_{v,r} * CR_{c,r} + s_{c} = 1\) |
Cargo on a single vessel, or left to spot market |
2 |
\(\forall v: \sum_r a_{v,r} + i_{v} = 1\) |
Each vessel can take only one route, or is idle |
Minimize: |
||
\(\sum_{v,r} T_{r} * a_{v,r} +\) |
Operational cost |
|
\(\sum_{v} IC_{v} * i_{v} +\) |
Unused vessel cost |
|
\(\sum_{c} SC_{p,c} * S_{c}\) |
Total cost of cargos left to the spot market |
|
Language
Route Generation
Before optimization, all possible routes are generated after data import, taking into account each cargo’s loading window to ensure timely delivery.
During the mathematical optimization process, each cargo is then assigned to either a time-chartered or voyage-chartered vessel within the model.
In this example, the vessel scheduling problem is solved by first generating the routes, followed by the mathematical optimization. The majority of the time is spent on route generation.
Example
A single vessel, vessel1, located at Caracas, is to handle two cargos, labeled: a1 and a2.
a1load in Paramaribo, deliver in Sao Paolo.
a2load in Montevideo, deliver in Rio de Janeiro.
Then there are five potential routes:
vessel1_a1_a2: With actions:
Sail to Caracas to Paramaribo.
Load Cargo
a1.Sail to Sao Paolo.
Deliver Cargo
a1.Sail to Montevideo.
Load Cargo
a2.Sail to Rio de Janeiro.
Deliver Cargo
a2.
vessel1_a2_a1: Similar asvessel1_a1_a2, just a different order of locations; and thus also different vessel sailing times and cargo pickup moments.
vessel1_a1:vessel1only handles cargoa1.
vessel1_a2:vessel1only handles cargoa2.
vessel1: Remains at port Caracas.
The route generation procedure is as follows:
For each vessel i, the idle route is generated:
vessel<i>. Together they initialize the set of just generated routes,JG.Move the set of just generated routes
JG, to the set of input routesIR.For each
rinIR, all cargoscare considered to be appended for a new router'. A router' = r_cis accepted if:cis not a part ofr,cis picked up in its time window, andcis delivered before the end of the horizon.
All routes
r'just generated, form the new set of just generated routesJG. If the setJGis empty, stop, otherwise continue with step 2.
Because a route r' ends later than route r, this procedure is finite.
In order to determine the cost of a route, careful administration of each leg needs to be done (sailing to the loading location, perhaps waiting, sailing to the delivery location).
Orchestrating External Python Libraries from AIMMS
This application also leverages the rich Python ecosystem from within an AIMMS application via the AIMMS Python-Bridge. This capability significantly extends the model’s functionality by integrating specialized third-party libraries.
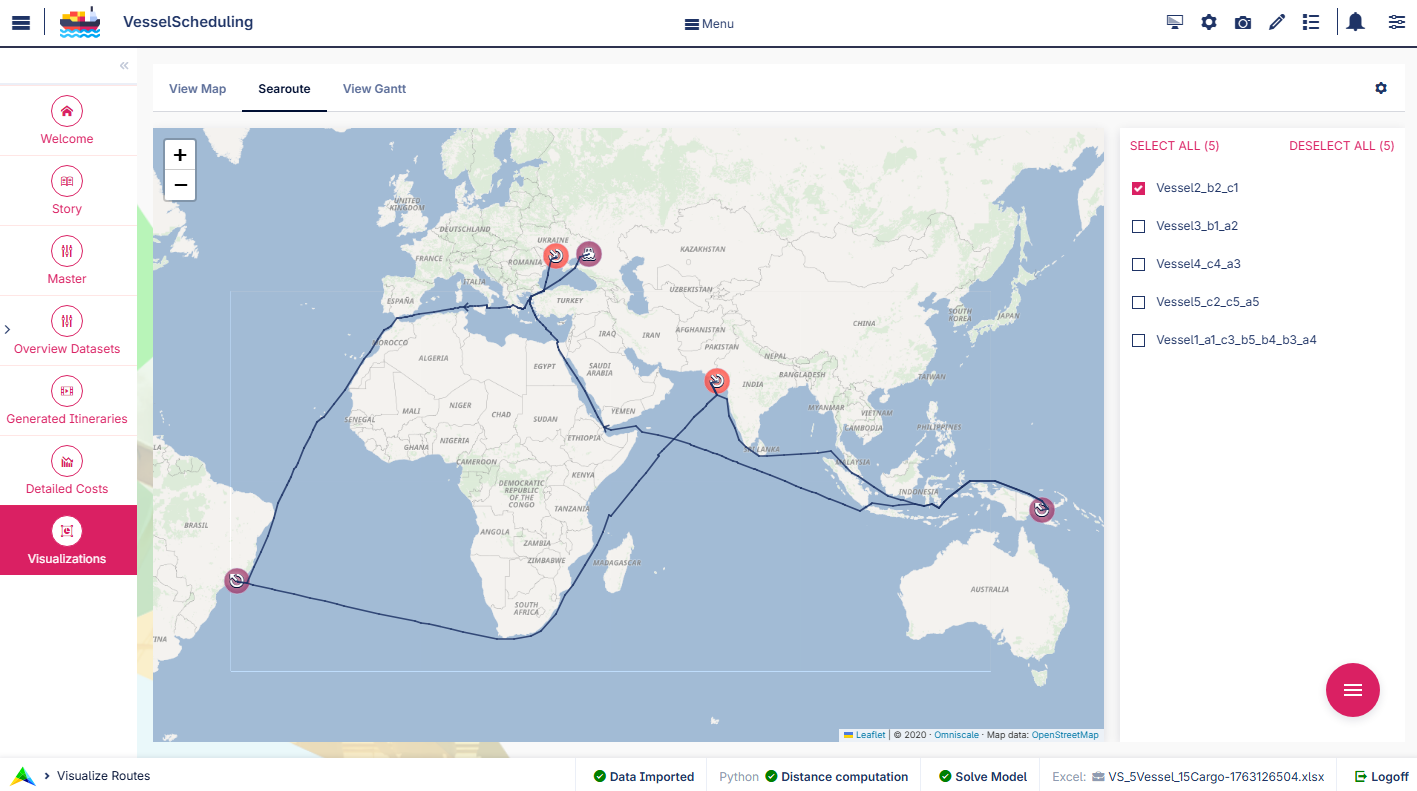
This example focuses on using the searoute library.
Instead of relying on fast but inaccurate geometric approximations (like Haversine distance), the Python library calculates realistic maritime distances and the actual GPS waypoints.
The data exchange is robustly handled using the pandas library:
Python retrieves required data (e.g., harbor coordinates) from AIMMS into a DataFrame using
aimms_model.multi_data().Python processes the data (e.g., iterates through pairs to compute the full distance matrix).
Python sends the structured results (the computed distances and waypoints) back to AIMMS parameters using a DataFrame and the
aimms_model.multi_assign()function.
This seamless integration enhances optimization quality and enables superior visual insights by allowing the AIMMS WebUI to display the geographically accurate routes.
See also
The complete guide, including installation and code examples, is available in the article: Orchestrating the searoute Python Library from AIMMS.
WebUI Features
On input page, if you click around the graphs, a highlighted cell will appear identifying the last clicked element. The results are displayed in a combination chart (stacked bar chart).
The following WebUI features are used:
UI Styling
Below there are the css files you will find with comments on what they change.
 1:root {
 2   --primaryDark: #DA2063;
 3   --primaryDarker: #FF4940;
 4   --secondary90Transparent: #ff4a4023;
 5   --secondary: #2E324F;
 6
 7   --bg_app-logo: 15px 50% / 40px 40px no-repeat url(/app-resources/resources/images/schedule.png); /*app logo*/
 8   --spacing_app-logo_width: 60px;
 9   --color_border_app-header-divider: var(--secondary); /*line color after header*/
10
11   --color_workflow-item-divider: var(--secondary90Transparent); /*workflow step divider color*/
12   --color_bg_workflow_current: var(--primaryDark); /*bg color when step is selected*/
13   --color_workflow_active: var(--primaryDark); /*font and icon color when step is active*/
14   --color_workflow-icon-border: var(--primaryDark); /*round border of the step*/
15   --color_bg_workflow_active: #ff4a400e;;
16
17   --color_bg_app-canvas: url(/app-resources/resources/images/RightBackground.png) rgb(249, 249, 249) no-repeat left/contain; /*background color*/
18   --color_bg_widget-header: linear-gradient(90deg, rgba(255,73,64,0.75) 0%, rgba(218,32,99,0.75)  100%); /*widget header background color*/
19   --border_widget-header: 2px solid var(--secondary); /*line color after widget header*/
20
21   --color_text_widget-header: var(--secondary);
22   --color_text_edit-select-link: var(--primaryDark);
23
24   --color_bg_button_primary: var(--primaryDark);
25   --color_bg_button_primary_hover: var(--primaryDarker);
26}
 1/*Hide checkbox contents of delete and edit annotations*/
 2.annotation-edit-element input.boolean-cell-editor-contents,
 3.annotation-delete-element input.boolean-cell-editor-contents{
 4   visibility: hidden;
 5   display: block;
 6}
 7
 8.annotation-edit-element {
 9   background: white url(img/pencil.png) no-repeat 50%/contain;
10   background-size: auto 70% ;
11}
12
13.annotation-delete-element {
14   background: white url(img/minus.png) no-repeat 50%/contain;
15   background-size: auto 50% ;
16
17}
18
19.annotation-NotInUse,
20.annotation-DeliveringPort,
21.annotation-VisibleLocations{
22   fill: #FE493F;
23   background: #FE493F !important;
24}
25
26.annotation-InUse,
27.annotation-LoadingPort{
28   fill: #9E3869;
29   background: #9E3869 !important;
30}
31
32.annotation-not-fulfilled{
33   background: #ffc21b2c;
34}
35
36.annotation-highlight-cell {
37   background: var(--secondary90Transparent);
38}
 1/*Centering cells*/
 2.tag-table .cell.flag-string .cell-wrapper,
 3.tag-table .cell.flag-number input,
 4.tag-table .cell.flag-string input{
 5   text-align: center;
 6}
 7
 8.tag-slider .slider-value {
 9   color: var(--color_text_edit-select-link);
10}
11
12.widget-menu__item .title {
13   color: var(--color_text_app-footer);
14}
15
16.ql-snow a {
17   color: var(--color_text_edit-select-link) !important;
18}
19
20input.boolean-cell-editor-contents {
21   accent-color: var(--primaryDark) /*boolean color*/
22}
23
24.react-contextmenu .react-contextmenu-item .display-text {
25   color: inherit;
26}
27
28
29.aimms-widget[data-widget\.uri="scl_EditAddElements"] .awf-dock.top,
30.aimms-widget[data-widget\.uri="msl_selecRoutes"] .awf-dock.top,
31.aimms-widget[data-widget\.uri="msl_selecRoutes_1"] .awf-dock.top,
32.aimms-widget[data-widget\.uri="Vessel loading_1"] .awf-dock.top{
33   display: none;
34}
35
36.status-message:hover,
37.status-message.clickable:hover .status-display-text {
38
39   background-color: #ffcdcb2d;
40   color: #505767;
41}
42
43.aimms-widget[data-widget\.uri="MappingCargoesWithCollors_2"] .leaflet-map-pane .arc:not(.annotation-midleg)  {
44   marker-end: none;
45}
46
47.veil-msg {
48   background-color: rgb(249, 249, 249);
49   color: var(--color_text_widget-header);
50}
Minimal Requirements
AIMMS Community license is sufficient for working with this example. To run the Python client, you will need to have Python installed, for this example we used Python 3.11.
To deploy the application on AIMMS Cloud, a commercial license is needed.
See also
Reference: Gustavo Diz, Luiz Felipe Scavarda, Roger Rocha, Silvio Hamacher (2014) Decision Support System for PETROBRAS Ship Scheduling. Interfaces 44(6):555-566.
A Python library to make it really easy to use AIMMS Cloud REST services
Release Notes
- v1.7 (06/05/2026)
Updated for AIMMS 26.1 and updated all library versions. Functional in the AIMMS Cloud.
- v1.6 (24/03/2026)
Commenting project. Revise README for clarity and additional detail.
- v1.5 (06/02/2026)
Adding support for horizontal scroll within Map Widget, read more in Sailing Across the World.
- v1.4 (04/11/2025)
Added Python script to use
searoutepackage for distance calculation instead of haversine formula.- v1.3 (07/10/2024)
Fixing integration problems (import and export) when using the project on AIMMS PRO Portal.
- v1.2 (23/09/2024)
Added support for
AimmsCmd, the task output now has three sheets, and the python now reads from the data folder inside the AIMMS project.- v1.1 (19/09/2024)
Performance of the route generation procedure was updated. Now you are able to solve using a Python call.
- v1.0 (15/08/2024)
First version of this application.