Warning
Please note that the documentation you are currently viewing is for an older version of our technology. While it is still functional, we recommend upgrading to our latest and more efficient option to take advantage of all the improvements we’ve made.
Align Objects in WinUI
When creating a WinUI page for your AIMMS project you typically want to nicely align the page objects.
For example, the different buttons you have on one page should all be the same size. Furthermore, if you have multiple buttons, you might also want to have them evenly spaced horizontally.
Of course, you could manually determine the pixels where each object should be placed, and use the position/size details in the status bar for the selected page object in developer mode. But this is a bit tedious.
Fortunately, there is a better way.
In WinUI (in Edit mode):
Select multiple objects on a page
Right-click any where in the selection
Hover over Align in the context menu, and select an option from the submenu as shown below:
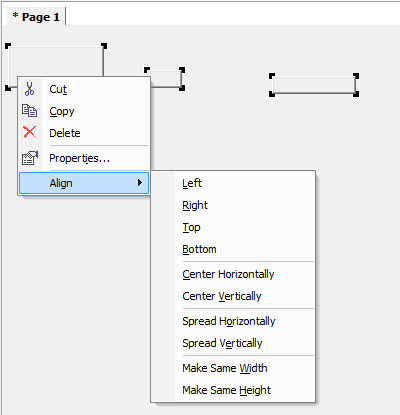
Fig. 68 Not aligned objects
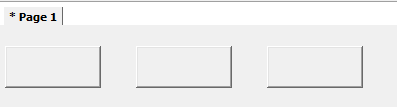
Fig. 69 Nicely aligned objects
For example, to align buttons to the top of the page, you would select Align > Top from the context menu. AIMMS will move all objects to the same level as the top-most object.
To match sizing of the objects, select the Make same width and Make same height options. All selected objects will be resized to the largest width and height.
To evenly space the buttons, select Spread horizontally (or Spread vertically). AIMMS will try to keep the same amount of spacing between adjacent objects.