Employee Scheduling
Story
In this example an optimal employee assignment is determined for a chain of restaurants. Each restaurant has different demands concerning the number of employees available and their skills. The objective of the optimization is to find the best placement of staff at the lowest cost, while taking into account shortage of skilled workforce.
The employees work in shifts and each position is primarily fulfilled by skilled employees. Assigning a less experienced staff member to a task will have impact on the overall cost.
Mathematical Model
The mathematical programming model for this example is a variation of the assignment problem. The similarity is that people are assigned to tasks, the differences are
that unmet demand is taken into account,
multiple shifts, and
the same skill is needed at different restaurants.
Employee Scheduling Problem |
||
|---|---|---|
Sets and indices: |
||
\(E\), \(e \in E\) |
employees |
|
\(R\), \(r \in R\) |
restaurants |
|
\(K\), \(k \in K\) |
skills |
|
\(H\), \(h \in H\) |
shifts |
|
Parameters: |
||
\(D_{r,h,k} \in \mathbb{I}\) |
demand of employees in the restaurants |
|
\(eD_{e,h} \in \{0..1\}\) |
employees’ availability for shifts |
|
\(eH_{e,k} \in \{0..1\}\) |
employees’ skills |
|
\(eP_{r,e,h,k} \in \mathbb{R}\) |
job preferences of the employees |
|
Variables: |
||
\(X_{r,e,h,k} \in \{0..1\}\) |
employees’ work schedule |
|
\(Y_{r,h,k} \in \mathbb{R_{+}}\) |
unfulfilled positions |
|
Constraints: |
||
1 |
\(\forall r,h,k: \sum_e X_{r,e,h,k} = D_{r,h,k} - Y_{r,h,k}\) |
satisfy demand |
2 |
\(\forall e,h: \sum_{r,k} X_{r,e,h,k} \leq eD_{e,h}\) |
assignment satisfies shifts |
3 |
\(\forall r,e,h,k: X_{r,e,h,k} \leq eH_{r,e,h,k}\) |
assignment satisfies skills |
4 |
\(\forall e: \sum_{r,h,k} X_{r,e,h,k} \leq 1\) |
maximum of one shift |
Minimize: |
||
\(\sum_{r,h,k} Y_{r,h,k} * 1000 + \sum_{r,e,h,k} X_{r,e,h,k} * eP_{r,e,h,k}\) |
total cost |
|
Language
In this section a few highlights of the use of the AIMMS Language in the application are pointed out.
Structure
This application structured its data nicely by using sections nested, as can be seen in the next screenshot. Each section at the leaf level contains a few identifiers which helps finding your way around the application.
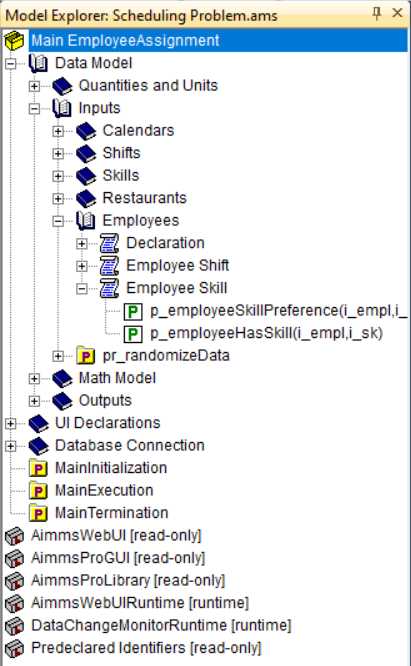
This structuring is meaningful; the structure can be used in the application, for instance in a mathematical program declaration like:
MathematicalProgram mp_minimizeCost {
    Objective: v_totalCost;
    Direction: minimize;
    Constraints: s_employeeAssignmentConstraints;
    Variables: s_employeeAssignmentVariables;
    Type: Automatic;
}
The set s_employeeAssignmentConstraints is constructed by intersecting the declarations inside the section Math_model with the predeclared AllConstraints.
Set s_employeeAssignmentConstraints {
    SubsetOf: AllConstraints;
    Definition: AllConstraints * Math_Model;
}
Such structuring eases grouping related constraints and variables together into a mathematical program; or rather, to work with multiple groups of constraints and variables and thereby defining multiple multiple mathematical programs in a single application.
Database
The Employee Scheduling example persists its data in a database, a SQLite database.
Connecting to the Database
A SQLite database is just a file, and authentication is not needed, so a connection string can be build as follows:
StringParameter sp_connectionString {
    Definition: {
        SQLCreateConnectionString (
                DatabaseInterface              :  'odbc',
                DriverName                     :  sp_def_driverName,
                ServerName                     :  "",
                DatabaseName                   :  "inputs.db", !The path of your database
                UserId                         :  "",
                Password                       :  "",
                AdditionalConnectionParameters :  "") ;
    }
}
Where sp_def_driverName is defined as:
StringParameter sp_def_driverName {
    Definition: {
        if pro::GetPROEndPoint() or not ProjectDeveloperMode() then
            "SQLite3"
        else
            "SQLite3 ODBC Driver"
        endif;
    }
}
Relating Tables in the Database to Tables in the AIMMS Model
An example of a table declaration in a SQLite database is illustrated in the next image:
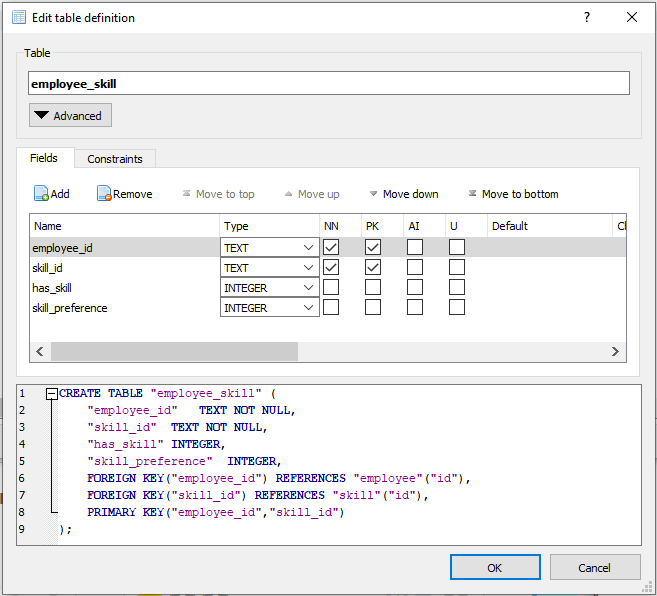
The AIMMS database declaration of the corresponding table is as follows:
DatabaseTable db_readEmployeeSkills {
    DataSource: sp_connectionString;
    TableName: "employee_skill";
    Mapping: {
        "employee_id"      -->i_empl,
        "skill_id"         -->i_sk,
        "has_skill"        -->p_employeeHasSkill,
        "skill_preference" -->p_employeeSkillPreference
    }
}
Once the connection string exists, the data in the tables is read by a database declaration and a read statement. If the data is changed in the user interface, the data is persisted using similar write statements.
Reading from the Database
As you can see, the column names of the table are used to relate to the AIMMS identifiers at hand.
Transferring the data from the SQLite database to the AIMMS application is done using the following read statement:
Procedure pr_readEmployeeSkillDB {
    Body: {
        empty Employee_Skill;

        read from table db_readEmployeeSkills;
    }
}
Note that Employee_Skill is a declaration section; all identifiers declared in that section will be emptied by the first statement in the procedure pr_readEmployeeSkillDB;
Writing to the Database
Transferring the data from the AIMMS application to the SQLite database is done using the following write statement:
Procedure pr_writeEmployeeSkillDB {
    Body: {
        write p_employeeHasSkill(i_empl, i_sk),
                p_employeeSkillPreference(i_empl, i_sk)
            to table db_readEmployeeSkills in dense mode;
    }
}
Annotations
On this project annotation is used on the Combination Chart. For this, we added a new css file:
 1 .annotation-red-chart {
 2     fill: var(--secondary);
 3 }
 4
 5 .annotation-not-red-chart {
 6     fill: var(--primaryDark);
 7 }
 8
 9 .annotation-red-input  {
10     border: 3px solid red;
11     border-radius: 3px;
12 }
13 .annotation-green-input  {
14     border: 1px solid green;
15     border-radius: 3px;
16 }
Create into a string parameter the logic or define directly with the css class you want. Go to the identifier shown on the Combination Chart and add that string parameter into webui::AnnotationsIdentifier.
The annotations used on the Combination Chart were red-chart and not-red-chart. The other two (green-input and red-input) are used on sp_addEditElement to create a border when adding or editing elements.
WebUI Features
On master page, there are two ‘hidden’ features. First is that if you click with the right button on either table widgets, a small menu will appear with CRUD options for that set. And, the Gantt chant is editable, i.e. you can modify start time and duration directly into the graph! Both results page have similar functionality, click around into the tables to see different views on the Gantts and graphs.
The following WebUI features are used:
UI Styling
Below there are the css files used on this project. They are separated by changes on the theme variables, annotations, and custom css changes that are not yet included to theme variables.
 1:root {
 2    --primary: #CDE6FF;
 3    --primaryDark: #3B92CC;
 4    --primaryDarker: #0069af;
 5    --primary90Transparent: #cde6ff36;
 6    --secondary: #F44336;
 7
 8    --bg_app-logo: 25px 50% / 30px 30px no-repeat url(/app-resources/resources/images/schedule.png); /*app logo*/
 9    --spacing_app-logo_width: 55px;
10    --color_border_app-header-divider: var(--primaryDark); /*line color after header*/
11
12    --color_bg_workflow_current: var(--primaryDark); /*bg color when step is selected*/
13    --color_workflow_active: var(--primaryDark); /*font and icon color when step is active*/
14
15    --color_bg_app-canvas: url(/app-resources/resources/images/RightBackground.png) rgb(249, 249, 249) no-repeat left/contain; /*background color*/
16    --color_bg_widget-header: linear-gradient(180deg, var(--primaryDark) 20%, var(--primaryDarker) 100%); /*widget header background color*/
17    --border_widget-header: 3px solid var(--primary); /*line color after widget header*/
18
19    --color_text_edit-select-link: var(--primaryDark);
20    --color_text_widget-header: white;
21
22    --color_bg_button_primary: var(--primaryDark);
23    --color_bg_button_primary_hover: var(--primaryDarker);
24}
 1.aimms-widget[data-widget\.uri="gnt_shiftGantt"] .awf-dock.top{
 2    display: none;
 3}
 4
 5.tag-label>.label {
 6    background: linear-gradient(180deg, rgba(255,255,255,1) 20%, var(--primary) 100%);
 7    border-bottom: 2px solid var(--primaryDark);
 8    font-weight: bold;
 9    color: var(--color_text_default);
10}
11
12/*Centering cells*/
13.tag-table .cell.flag-string .cell-wrapper,
14.tag-table .cell.flag-number input,
15.tag-table .cell.flag-string input{
16    text-align: center;
17}
18
19input.boolean-cell-editor-contents {
20    accent-color: var(--primaryDark) /*boolean color*/
21}
 1.annotation-red-chart {
 2    fill: var(--secondary);
 3}
 4
 5.annotation-not-red-chart {
 6    fill: var(--primaryDark);
 7}
 8
 9.annotation-red-input  {
10    border: 3px solid red;
11    border-radius: 3px;
12}
13.annotation-green-input  {
14    border: 1px solid green;
15    border-radius: 3px;
16}
Minimal Requirements
AIMMS Community license is sufficient and ODBC instalation is necessary for working with this example.
Release Notes
- v1.5 (17/03/2026)
Commenting the project.
- v1.4 (30/09/2024)
Updating the Case Manager procedures to work instead of Upload and Download Widget to
webui::RequestFileDownloadandwebui::RequestFileUpload.- v1.3 (20/09/2024)
Upgrading AIMMS version and WebUI library version.
- v1.2 (15/01/2024)
Ready to solve mathematical problem on AIMMS Cloud. Centering all cells.
- v1.1 (25/07/2023)
Save Case dialog is now Case Manager dialog, where you can save a copy of a scenario and also load it.
- v1.0 (30/06/2023)
Updated to 4.96 and using the new theming variables.
See also
Need to go deeper into DB connections? This course is perfect for you!