Nice to Meet You pyaimms from Python-Bridge
The Python-Bridge allows AIMMS applications to call Python code and exchange data with Python libraries. This how-to demonstrates a clean integration pattern: how to configure the bridge, manage dependencies, and exchange multi-dimensional identifiers between AIMMS and Python.
The example uses a simple matrix transpose to illustrate the integration steps rather than the Python logic itself.
The Concept
Environment management:
AIMMS uses
uvto create and manage a project-specific Python environment automatically.Connection layer:
The
aimmspylibrary provides a typed access to exposed AIMMS identifiers.Data exchange model:
Multi-dimensional identifiers are transferred as long-format DataFrames where:
Each index becomes a column.
The value column is named after the identifier.
Example: Demonstrating Data Exchange
Goal: Given a square matrix \(P(i,j)\) in AIMMS, compute its transpose \(P^T(j,i)\) using the Python library Polars.
The matrix transpose is used only to illustrate how multi-dimensional data is transferred and manipulated in Python.
Prerequisites
Python 3.13
AIMMS 25.4 or later
Steps Taken with the Python Files
Step 1: Add the pyproject.toml File
uv manages the Python versions and virtual environments automatically.
A minimal pyproject.toml file, which defines the project dependencies, is as follows:
 1[project]
 2name = "nice-to-meet-you-transpose-matrix"
 3version = "0.1.0"
 4description = "Good to see you again (after aimmspy)"
 5requires-python = "==3.13.*"
 6dependencies = [
 7    "aimmspy>=25.3.1.8"
 8]
 9[tool.uv]
10python-preference = "only-managed"
Remarks:
Line 5:
pyaimmsis available from Python 3.10 onwards; here we choose Python 3.13.
For instance, to add the Python library Polars, execute the command:
1uv add polars
This creates or updates the .venv environment and adds the dependency:
1dependencies = [
2    "aimmspy>=25.3.1.8",
3    "polars>=1.30"
4]
Note
Place this file in the project folder, next to the .aimms file.
Regarding the Python-Bridge, we will follow the project structure:
AIMMS-project/
 ├─ 689-nice-to-meet-you-python-bridge.aimms
 ├─ pyproject.toml
 └─ PythonScripts/
     ├─ pyaimms_bridge.py
     └─ transpose.py
Step 2: Define the Connection (pyaimms_bridge.py)
This file defines the Python to AIMMS connection.
1from aimmspy.project.project import Project, Model
2from aimmspy.model.enums.data_return_types import DataReturnTypes
3
4project : Project = Project(
5    exposed_identifier_set_name = "AllIdentifiers",
6    data_type_preference = DataReturnTypes.POLARS
7)
8
9aimms_model : Model = project.get_model("model_stub.py")
Remarks:
Line 5: Exposes all identifiers in the AIMMS model to Python.
Line 6: Specifies the data format used for multi-dimensional identifiers. Available options are
DICT,ARROW,PANDAS, andPOLARS. In this example, we choosePOLARS.Line 9: The Python bridge generates a typed stub file (
model_stub.pyi). The callget_model("model_stub.py")loads this stub for typed access.This provides typed access to exposed identifiers.
It is regenerated when the model changes.
It should not be edited manually.
This example uses a singleton (pyaimms_bridge.py) to maintain a persistent connection during the session.
Note
Place this file in the PythonScripts subfolder.
Step 3: Write the Logic (transpose.py)
In AIMMS, a multi-dimensional parameter such as P(i,j) is defined over index domains i and j,
which can be interpreted mathematically as row and column indices of a matrix.
When transferred to Python via the bridge, the parameter is represented as a long-format DataFrame. In this representation:
Each AIMMS index becomes a column in the DataFrame.
The parameter values appear in a column named after the identifier (e.g.,
P).
For example, P(i,j) is transferred as:
i   j  p
1   1  11
1   2  12
...
Thus, although i and j represent row and column indices conceptually,
they are both columns in the Python DataFrame representation.
Similarly, PT(i,j) is returned as a long-format DataFrame:
i   j  pt
1   1  11
2   1  12
...
The pyaimms_bridge module exposes the AIMMS model through the object aimms_model.
Through this object, Python reads and writes AIMMS identifiers such as parameters, sets, and variables, using:
.data()to retrieve an AIMMS identifier as a DataFrame..assign()to assign Python data back to an AIMMS identifier.
Transposing a matrix corresponds to swapping the index columns i and j.
The Python implementation:
 1from PythonScripts.pyaimms_bridge import aimms_model
 2
 3def transpose_matrix():
 4    """
 5    Transposes matrix p to pt.
 6    """
 7
 8    # Get the DataFrame from AIMMS.
 9    p_df = aimms_model.p.data()
10
11    # Swap index dimensions and rename the value column.
12    pt_df = p_df.rename({'j': 'i', 'i': 'j', 'p': 'pt'})
13
14    # Send data back to AIMMS.
15    aimms_model.pt.assign(pt_df)
Remarks:
Line 9: Retrieves parameter
pas a Polars DataFrame.Line 12: Swaps the index columns and renames the value column.
Line 15: Assigns the result to parameter
ptin AIMMS.
Note
Place this file in the PythonScripts subfolder.
Steps Taken in the AIMMS Project
Step 1: Prepare AIMMS Project
Add the pyaimms repository library via the Library Manager in AIMMS Developer:
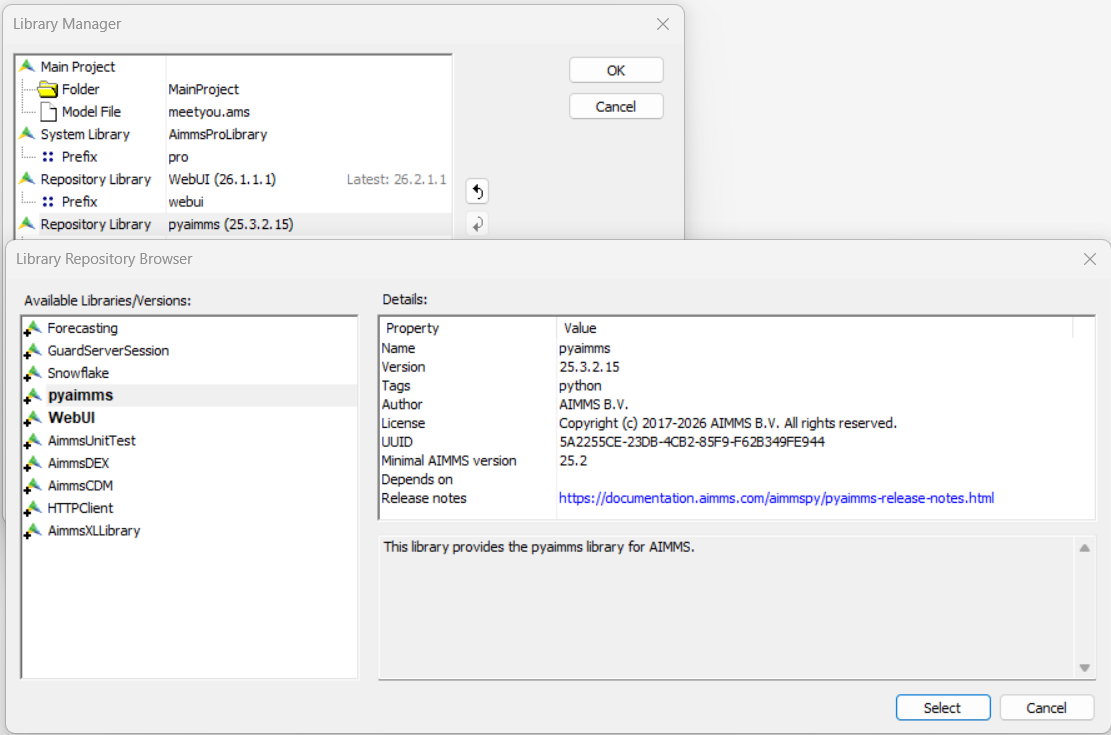
This makes the py:: procedures available in the AIMMS model.
Step 2: Create the Link from the AIMMS Model to the Python Function
1py::run_python_script("PythonScripts/transpose.py");
This command loads the Python module into the interpreter so its functions
can be executed from AIMMS via py::run_python_statement.
In the example project provided, this procedure is called during initialization.
Step 3: Execute the Python Function from within AIMMS Model
1py::run_python_statement("transpose_matrix()");
This executes the Python function transpose_matrix.
In the example project, this call is part of procedure pr_transpose.
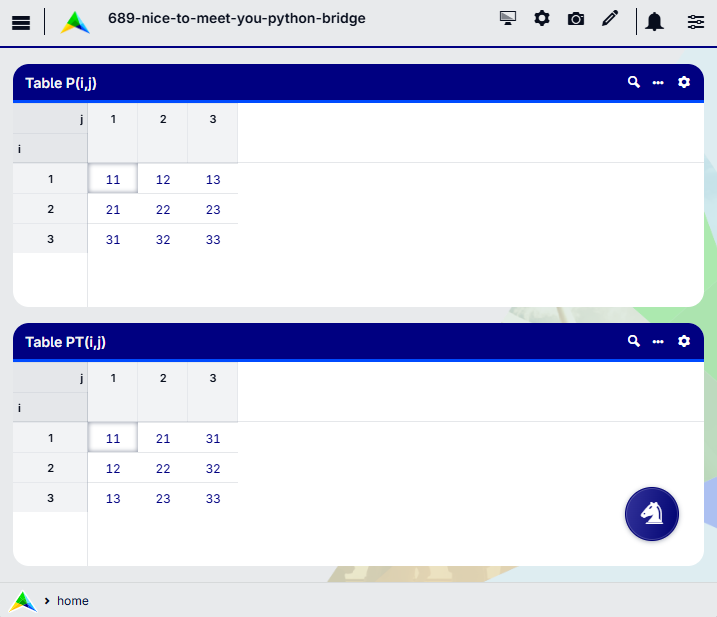
Step 4: Trigger the Python Procedure from the WebUI
The procedure pr_transpose is activated by pressing the button ♘ in the WebUI:
Conclusion
This how-to covers:
Managing dependencies with
uv.Connecting via
aimmspyusing a singleton pattern to ensure a single shared connection between AIMMS and Python.Transferring data using DataFrames (Polars, Pandas, etc.).
Calling Python logic directly from AIMMS procedures.