Adding a Logo to an AIMMS WebUI App Using AIMMS 4.84 and Older
This short article illustrates adding a logo to an AIMMS WebUI application.
The Eample Provided
Please download The AIMMS 4.81 sample application to experiment with the example.
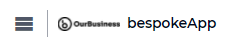
The top bar of this app looks as follows (snapshot taken with a browser zoom of 200%):
To achieve this, the following two files:
Placeholder logo@2x.pngicon.css
have been added to the folder <project>\MainProject\WebUI\resources\css.
The Example Explained
The contents of the icon.css are presented below and then discussed.
 1.theme-aimms header h1 .pages .app-name {
 2    margin-top:7px; /* this fixes the vertical alignment of the app name with the icon */
 3}
 4
 5.theme-aimms header h1 .pages .app-name::before {
 6    content: '';
 7    background: url("Placeholder logo@2x.png") no-repeat center/contain;
 8    float: left;
 9    width: 124px;
10    height: 28px;
11    margin-left: 0px;
12    margin-right: 7px;
13    transform: translateY(-5px);
14}
Some remarks about the above code, in case you want to adopt and adapt the above .css file for your application:
Lines 1-3: This code is needed such that the app name is nicely aligned vertically with the logo.
On line 7: you can fill in the name of the image of your logo. A few examples of acceptable file formats are
.png,.jpg,.gif,.svg, and.webp.The phrase “center/contain” will ensure that your icon always adjusts to fit within the width/height you set on lines 9 and 10, while maintaining the correct aspect ratio.
Lines 9,10 define the size of the area on the screen in which to place the logo.
For instance, halving the width results in:
As you can see, the aspect ratio of the image is kept.
In the example, the dimension of the image is 354 x 80. Therefore, by using height 28 and width 354 / ( 80 / 28 ) = 124, the image is completely filling the area allotted.
Line 11 specifies the space between the Menu-icon and the app-logo. Increasing that to 80px looks as follows:

Line 12 specifies the space between the logo and the app-name. Increasing that to 87px looks as follows:

Line 13: Examples of the numerous transformations supported by the transform property are rotating, scaling, and moving.
Tips on Tweaking
It goes without saying that you should replace
Placeholder logo@2x.pngby an image file containing the logo of choice.It is advised to keep the size of the image file small; after all, the image will be part of .aimmspacks and every user will have to download the image upon first time opening of the application.
In AIMMS Developer you can tweak the file
icon.cssand then refresh the browser page to see the result without having to restart the project.You may want to use different browser zooms, for instance 100% and 200%, to evaluate the result.
Lines 2, 10, and 13 all have to do with vertical alignment. We suggest you:
First, select a height (line 10) and a corresponding width (line 9) to determine how large the area is on which you want to present your logo. To select the width you probably want to use: <image-width>/(<image-height>/<selected-height>) to create an area which your logo optimally fills.
Second, move the icon up or down using the
transform > translateattribute as illustrated on line 13.
Logo Attribution
The placeholder logo used in this article was created by Paul Wolfs from Total Design (http://www.totaldesign.com).