Develop a Python service and integrate it into AIMMS
In today’s data-driven world, the integration of powerful machine learning capabilities into optimization applications is becoming increasingly important. This article explores the seamless integration of AIMMS with a Python service built using FastAPI, Pydantic, and Uvicorn. We’ll dive into how to leverage this service by creating an OpenAPI AIMMS library, and deploy this library first in AIMMS Developer and subsequently use the resulting app on the AIMMS Cloud.
Introduction
In the world of problem-solving, AIMMS serves as a reliable workhorse, helping organizations make data-driven decisions and streamline operations. On the other hand, Python has earned its stripes as a go-to language for data manipulation and modeling. When these two powerhouses combine forces, it’s like unlocking a toolbox full of solutions. Complex optimization challenges meet Python’s adaptable strength, paving the way for practical solutions and improved efficiency.
Join us on this journey as we unravel the art of bridging the gap between AIMMS and Python, unlocking the potential for innovation and efficiency in your modeling endeavors.
The remainder of this article is organized as follows:
First, we’ll present the story, the background against which the technology is illustrated.
Second, we’ll built the Python service.
Third, we’ll deploy the service using an AIMMS application.
Story: Bias in AI
The combination of machine learning and everyday applications is at the heart of modern tech advancements. From predicting trends to powering self-driving cars, machine learning reshapes how we use data to make smarter choices. But, hidden beneath its brilliance is a complex issue - bias within these algorithms.
In this example, we illustrate Bias, by creating an AIMMS front-end to an existing Python application. The Python application is from Kaggle who teaches about bias in the context of ethics.
The AIMMS application uses the following steps:
Get a comment from a user to determine its toxicity
Read in training data
Select two columns from this training data: the comment and the toxicity
Pass the training data and the user entered comment to a Python service
The Python service returns whether it considers the user comment to be toxic or not.
Note
This app demonstrates bias, which can be observed by entering comments like:
blackwhich is marked toxic, andwhitewhich is marked not toxic.
A few remarks on the choice of this example:
This example is about checking whether there is bias in your data. At first, this may seem far fetched for Decision Support applications. However, basing a decision on data that is not representative of your market is not a good idea!
A practical aspect of this example is that the communication between two processes is relatively simple: a row of objects and a few scalars - that is all. In practice, there is often significantly more detail to the structure of the data communication; however, that extra detail in structure will not make the flow of information easier to understand.
Developing the Python service
Machine learning core
The core of the Python app is based on materials from Bias in AI. For the Machine Learning core it uses scikit-learn, in particular:
train_test_split Split arrays or matrices into random train and test subsets.
CountVectorizer Convert a collection of text documents to a matrix of token counts.
LogisticRegression Create Logistic Regression (aka logit, MaxEnt) classifier.
How these utilities work in detail is outside the scope of this article.
Information communicated
The input (training data) to this machine learning code is an array of observations, whereby each observation consists of a comment (a text string), and a target (a binary indicating toxic when 1). In addition, the input has a user-comment. The purpose of the service is to predict whether this user comment is toxic or not.
The output to this machine learning code is a zero (not toxic) or one (toxic).
So how do we model these inputs and output?
Data Modeling with Pydantic
Pydantic is renown for its data modeling.
This library is widely used for its data validation.
Here Basemodel is imported from Pydantic.
First we construct the observation.
1# Usually an observation has many attributes, but we use only these two here.
2class Observation(BaseModel):
3    comment: str  # An observed text
4    target: int  # A verified zero / one whether this text is considered toxic.
Next we create a row of observations and add a few scalars to it.
1# The input class for the Bias_in_AI app:
2class BiasInAIInputTuples(BaseModel):
3    no_observations: int
4    observations: list[Observation]  # length is no_observations
5    new_comment: str                 # determine for this string, whether it is toxic or not.
With that we have the input modeled. Next, we define the class for the output, which is just a single number.
1# The output class for the Bias_in_AI app:
2class BiasInAIOutput(BaseModel):
3    is_toxic: int  # 0: not toxic, 1: toxic.
Building the Python Service with FastAPI
Using FastAPI the paths are easily defined.
First create a global that represents the service, called app.
1# Create the application object
2app = FastAPI()
Remarks:
Line 2: Create the app, entry point for the provided services.
Next, for every path, here just one, name its inputs and outputs, as specified using Pydantic:
1# Define the actual function ``compute`` to learn and predict and associate this function with the path ``/compute``
2@app.post("/compute", response_model=BiasInAIOutput)
3async def compute(inp: BiasInAIInputTuples) -> BiasInAIOutput:
Line 2: Define the path
/compute.Line 3: Actual function definition. As Pydantic is used by FastAPI, this ensures that
/computeinput is validated against the data validation rules ofBiasInAIInputTuples. In addition, the output will be according to the classBiasInAIOutput.
Deploying the Python Service with Uvicorn
And now running the service using Uvicorn
1if __name__ == "__main__":
2    uvicorn.run("main:app", host="", port=8000, log_level="info")
Extras from the combo Pedantic, FastAPI and uvicorn
There are a few extras that come with this combo, and, admittedly, I’ve grown used to those extras being present:
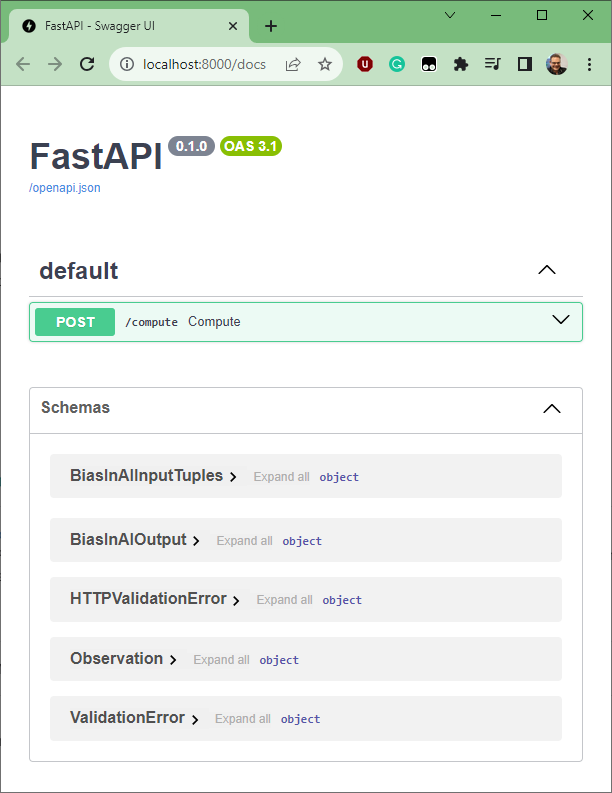
Get Swagger dynamic interface docs. By entering the URL
http://localhost:8000/docsyou will get the interface documented. It looks as follows:Click me to see the screenshot 👇
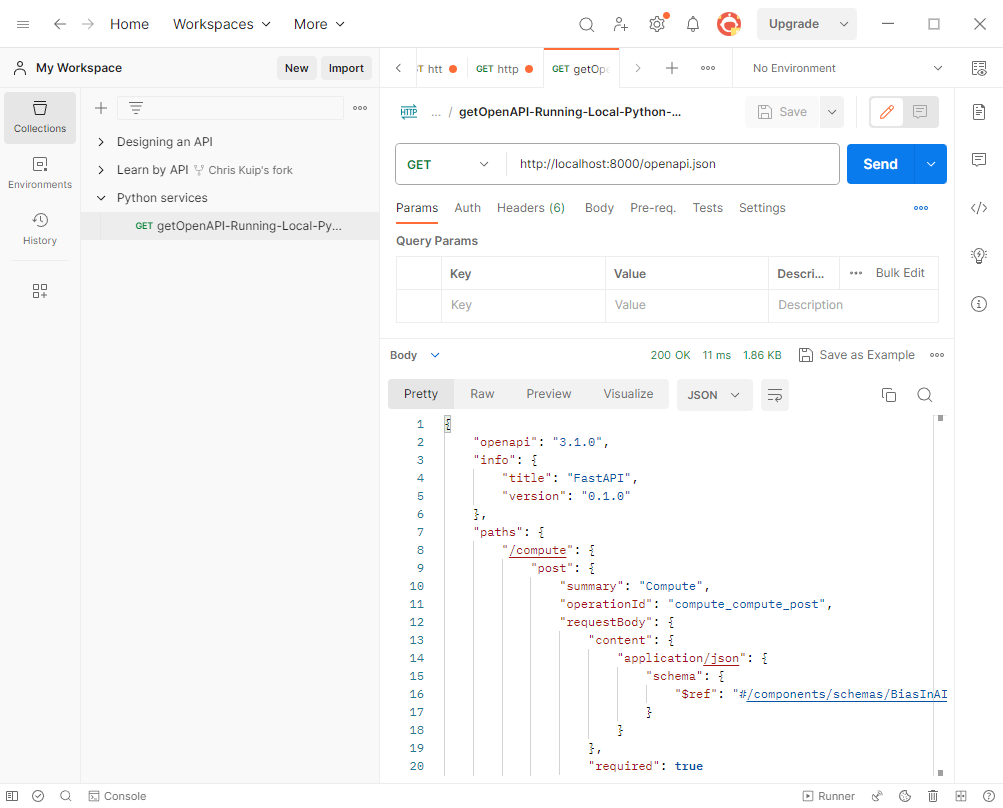
Get OpenAPI 3.1 specification. An OpenAPI 3.1 specification of the interface can also be easily obtained, by doing a HTTP Get on
http://localhost:8000/openapi.json. Note that there are various tools to work with such a specification.Using Postman, obtaining such a specification looks as follows:
Click me to see the screenshot 👇
We will be using this
openapi.jsonfile in the next chapter to base the communication by the AIMMS client on.
AIMMS Integration
The architecture of the AIMMS WebUI app, equipped with a generated OpenAPI library, regarding using this service looks as follows:
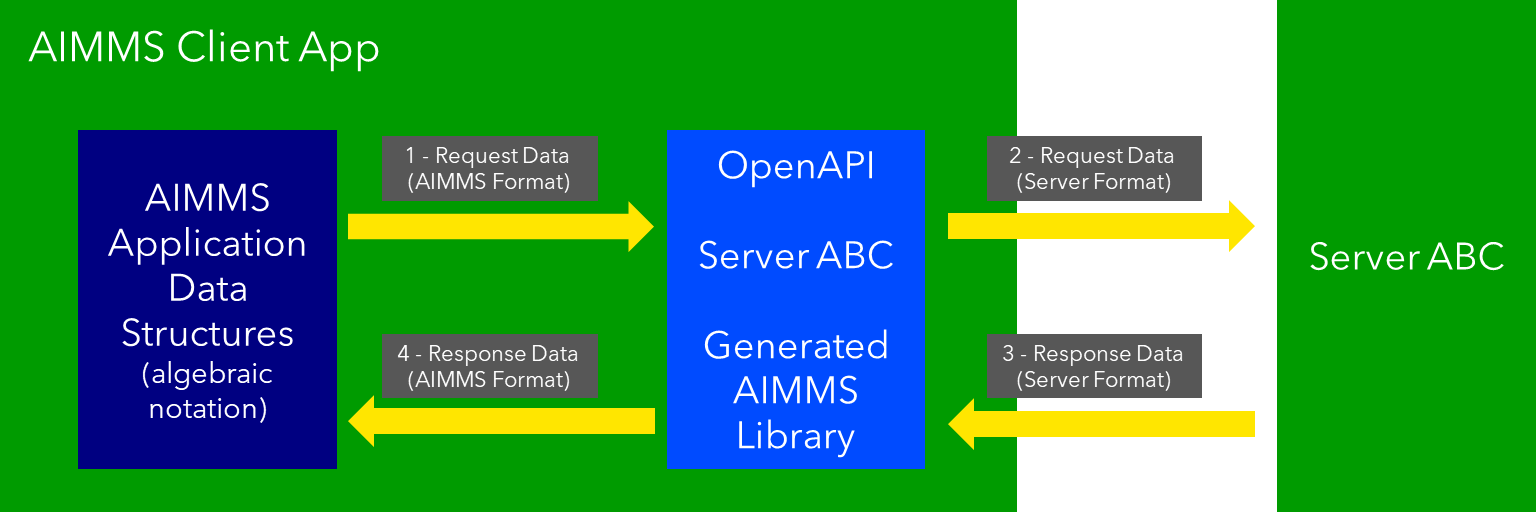
With this architecture, an AIMMS client only uses assignment statements to:
Provide the input to the service at hand, and
Receive the output from that service.
There is no need for the AIMMS app developer to write conversion specifications.
How do we create such an AIMMS OpenAPI library? This is discussed in the next section.
Building a OpenAPI library from the Python app running as a service
https//:8000/openapi.json provides a copy of the OpenAPI 3.1 specification of the interface created in the Python app.
Using this specification, an AIMMS Library is created using:
1dex::schema::GenerateClientFromOpenAPISpec(
2    schemaFile      :  "openapi/openapi-biasInAITuples.json",
3    schemaName      :  "openapi-biasInAITuples",
4    schemaPrefix    :  biasInAITuples,
5    explodeDefault  :  1,
6    generateXMLData :  0);
Remarks:
Line 2: input, filename.
Line 3: output, name of the library
Line 4: And its prefix
Line 5: The library generated permits asynchronous calls and able to maintain data of the REST API call history.
Further information about generating such an AIMMS library:
Using Python Services in AIMMS Developer
 1Procedure pr_callBiasInAITuples {
 2    Body: {
 3        ! By not setting the RequestResponseFilePrefix, we will be using memory streams!
 4        ! biasInAITuples::api::RequestResponseFilePrefix:= "requestsResponses/" ;
 5
 6        ! As the OpenAPI library maintains a history of Rest API calls, we need to identify the call at hand:
 7        biasInAITuples::api::NewCallInstance(ep_loc_callInstance);
 8
 9        block ! Fill in the data for making the request.
10
11            ! Pass the data from the data model to the corresponding data in the biasInAI library.
12            biasInAITuples::_BiasInAIInputTuples::no_observations(ep_loc_callInstance) := p_def_cardID ;
13            biasInAITuples::_BiasInAIInputTuples::new_comment(ep_loc_callInstance) := sp_queryToInvestigate ;
14            biasInAITuples::_BiasInAIInputTuples::_observations::observations_iter := ElementRange( 1, p_def_cardID );
15
16            ep_loc_iterToId( biasInAITuples::_BiasInAIInputTuples::_observations::i_observations )
17            := element( s_ids, val( biasInAITuples::_BiasInAIInputTuples::_observations::i_observations ) );
18
19            biasInAITuples::_BiasInAIInputTuples::_observations::comment_( ep_loc_callInstance, biasInAITuples::_BiasInAIInputTuples::_observations::i_observations)
20            := sp_commentText( ep_loc_iterToId( biasInAITuples::_BiasInAIInputTuples::_observations::i_observations ) );
21
22            biasInAITuples::_BiasInAIInputTuples::_observations::target(ep_loc_callInstance, biasInAITuples::_BiasInAIInputTuples::_observations::i_observations)
23            := bp_target( ep_loc_iterToId( biasInAITuples::_BiasInAIInputTuples::_observations::i_observations ) ) ;
24
25            block ! Check if we passed the data correctly.
26                _p_commentsCard := card( biasInAITuples::_BiasInAIInputTuples::_observations::comment_ );
27                if _p_commentsCard <> p_def_cardID then
28                    ! display _p_commentsCard, p_def_cardID ;
29                    raise error "internal error passing data \'comments\'" ;
30                endif ;
31
32            endblock ;
33        endblock ;
34
35        ! Install hook, which will copy the desired response data or handle the error
36        biasInAITuples::api::compute_compute_post::UserResponseHook
37        := 'pr_responseHookTuples' ;
38
39        ! Start the request.
40        biasInAITuples::api::compute_compute_post::apiCall(ep_loc_callInstance);
41    }
42    ElementParameter _ep_id {
43        Range: s_ids;
44    }
45    ElementParameter _ep_cmtNo {
46        Range: biasInAITuples::_BiasInAIInputTuples::_observations::observations_iter;
47    }
48    Parameter _p_commentsCard;
49    ElementParameter ep_loc_callInstance {
50        Range: dex::Instances;
51    }
52    ElementParameter ep_loc_iterToId {
53        IndexDomain: biasInAITuples::_BiasInAIInputTuples::_observations::i_observations;
54        Range: s_ids;
55    }
56}
Remarks:
In the code fragment above, lines 11 to 23 pass the data from the client to the OpenAPI library. This corresponds to action 1 in the image above.
On line 40, the call to the OpenAPI library is made to convert its data structures (action 2 in the image above) to the data structure format of the service, and to do make the Rest API call to the service.
 1Procedure pr_responseHookTuples {
 2    Arguments: (ep_in_callInstance);
 3    Body: {
 4        ep_loc_status := biasInAITuples::api::CallStatusCode(ep_in_callInstance);
 5
 6        if StringLength( sp_queryToInvestigate ) > 5 then
 7            sp_log_cmtShort := substring( sp_queryToInvestigate, 1, 5 ) + "..." ;
 8        else
 9            sp_log_cmtShort := sp_queryToInvestigate ;
10        endif ;
11        switch (ep_loc_status) do
12            '200': ! Call went ok.
13                bp_calc_commentInvestigatedIsToxic := biasInAITuples::_BiasInAIOutput::is_toxic(ep_in_callInstance) ;
14                ep_calc_queryAnswer(ep_query) := if bp_calc_commentInvestigatedIsToxic then 'Toxic' else 'Not Toxic' endif;
15                sp_calc_imageQueryAnswer := if bp_calc_commentInvestigatedIsToxic then "toxic.png" else "not_toxic.png" endif;
16                biasInAITuples::_BiasInAIInputTuples::EmptyInstance(  ep_in_callInstance );
17                biasInAITuples::_BiasInAIOutput::EmptyInstance( ep_in_callInstance );
18
19            '422': ! HTTP validation error.
20            default:
21                display { biasInAITuples::_HTTPValidationError::_detail::msg,
22                    biasInAITuples::_HTTPValidationError::_detail::type_ },
23                    biasInAITuples::_HTTPValidationError::_detail::_loc::loc ;
24                raise error formatString("biasInAITuples::isToxic(%s)/%s failed ( status: %e, error: %e): %s",
25                    sp_log_cmtShort,  ep_in_callInstance,
26                    biasInAITuples::api::CallStatusCode(ep_in_callInstance),
27                    biasInAITuples::api::CallErrorCode(ep_in_callInstance), "" );
28
29        endswitch;
30    }
31    Comment: {
32        "Client specific code for handling the response from the server, here
33        whether the comment at hand is toxic or not."
34         DeclarationSection Locals {
35        ElementParameter ep_in_callInstance {
36            Range: dex::Instances;
37            Property: Input;
38        }
39        ElementParameter ep_loc_status {
40            Range: dex::HTTPStatusCodes;
41        }
42        StringParameter sp_log_cmtShort;
43    }
44}
The procedure pr_responseHookTuples specified above, looks a bit bulky, but the essence,
for a successful call, verified by HTTP status code 200, is on line 13.
Subsequently, lines 14, 15 are used for the communication to the end-user.
The remainder of this procedure is to notify, handle errors, and track when needed.
Regarding the above image: action 3 is taken care of by the callback procedure
declared next to the apiCall procedure called at the end of pr_callBiasInAITuples.
Action 4, corresponds to the procedure pr_responseHookTuples just discussed.
The above provides a nice framework that can be used on a development machine. But how about deploying the apps created? This will be discussed in the next chapter.
Local testing
Once the AIMMS app and the Python app are finished, it is possible to test the combo on your development machine.
First start the Python app, it should come up with something like:
INFO:     Started server process [6320]
INFO:     Waiting for application startup.
INFO:     Application startup complete.
INFO:     Uvicorn running on http://:8000 (Press CTRL+C to quit)
After this you can start the AIMMS App in AIMMS Developer.
Navigate to page results, and enter a phrase for which you want the toxicity to be tested.
Send it to the Python service by clicking on the two masks in the lower right of the screen.
After a minute or so, the response should come back.
Note that training takes place for every request made; there is no caching of the computed machine learning model built in yet. (Clearly one of our todo’s).
Deploying Python Services on AIMMS Cloud
To publish the Python app, the script should be published on AIMMS PRO storage, and the container, including the python interpreter and its libraries should be identified.
To identify the container in which the Python service runs, a json file is used, for instance the following one:
 1{
 2    "serviceId": "biasInAIService",
 3    "image" : {
 4        "name": "services/aimms-anaconda-service",
 5        "tag" : "2022.10"
 6    },
 7    "appConfig": {
 8        "argv" : [ "python3", "main.py" ],
 9        "env"  : [
10        ],
11        "listenPort" : 8000
12    }
13}
Here, the
serviceIddescribes the name to be used for the serviceimagedescribes the container, here Python, Anaconda distribution 2022.10 is used.appConfigwhich interpreter to use, and which Python scripts.
With this information, and the location of the uploaded zip file on AIMMS PRO storage containing the Python script,
the service can be launched on the AIMMS Cloud using procedure pro::service::LaunchService, as follows:
1_p_retCodeLaunchService := pro::service::LaunchService(
2    connectionURI :  _sp_remoteURL,                   ! output, to address the service started.
3    jsonSpec      :  "biasInAIService/biasInAI.json", ! input, json file containing service configuration.
4    storedApp     :  "pro://" + _sp_appStoragePath);  ! input, location of the zip file containing the Python script.
If this call is successful, there is one small statement that should not be forgotten, namely to specify which server the generated OpenAPI AIMMS library should use:
1biasInAITuples::api::APIServer := "http://" + _sp_remoteURL;
Here _sp_remoteURL is output from the procedure pro::service::LaunchService.
Conclusion
Modern tools from
Python, especially the libraries Pedantic, FastAPI, and uvicorn,
AIMMS Data Exchange library, especially the generation of OpenAPI clients, and
AIMMS Cloud, especially the feature to launch additional services
make connecting a Python service to an AIMMS app, and subsequently deploying the combo, relatively straightforward.